Playwright Test
Playwright Test is a test runner specifically designed to accommodate the needs of browser-based end-to-end and component test automation using the Playwright web automation library. Playwright supports all modern rendering engines, including Chromium, WebKit, and Firefox. It also enables test execution on Windows, Linux, and macOS, whether locally or in CI environments, in both headless and headed modes, with native mobile emulation for Google Chrome on Android and Mobile Safari.
Serenity/JS revolutionises automated testing by enabling teams to write expressive, maintainable tests that align with their unique domain. Seamlessly integrating with Playwright and Playwright Test, Serenity/JS also offers advanced reporting that provides clear insights into test results, aiding both technical teams and business stakeholders in assessing system quality.
Benefits of integrating Playwright Test with Serenity/JS:
- Enhanced Reporting – Use Serenity/JS to augment Playwright Test reports and generate living documentation with Serenity BDD.
- Reusable Code – Leverage the Screenplay Pattern to write maintainable test code, facilitate collaboration, and implement multi-actor, multi-interface test scenarios.
- Integration Libraries – Interact seamlessly with REST APIs, local Node.js servers, and verify complex workflows with ready-to-use integration libraries.
In this guide, you will learn how to:
- Install Playwright Test and its dependencies.
- Add Serenity/JS integration and reporting modules to new or existing Playwright Test projects.
- Configure test reports and generate living documentation.
- Implement Playwright Test scenarios using Serenity/JS Screenplay Pattern APIs and the Serenity/JS Playwright module.
Quick start 🚀
To start testing immediately, consider using:
- Serenity/JS Project Templates for Playwright Test - Pre-configured with essential dependencies.
- Serenity/JS GitHub Codespaces - Ready-to-use cloud-based development environments.
- Serenity/JS reference implementations on GitHub.
See what Serenity/JS is capable of without installing anything on your machine - start with our 15-minute web testing tutorial!
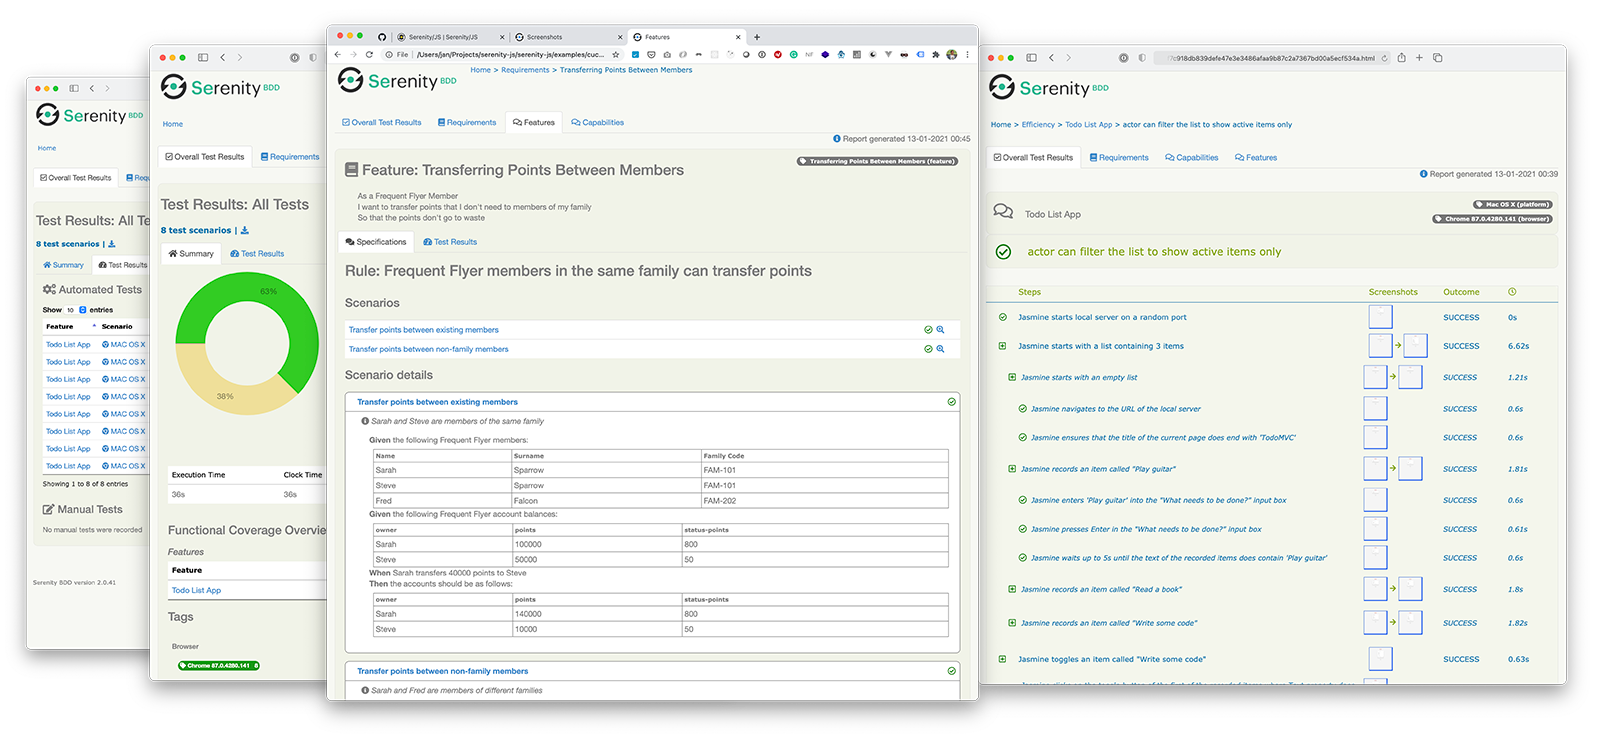
To see Serenity/JS reporting in action, explore the live reports generated by the Serenity/JS Playwright Test Template:
Installation
To use Serenity/JS with Playwright Test, follow the Serenity/JS installation guide to set up your development environment and core runtime dependencies. Then, create a new Playwright Test project or add Serenity/JS integration and reporting modules to an existing project.
Initialising a Playwright Test project
If you already have a Playwright Test project, skip this step and proceed to installing Serenity/JS.
To create a new Playwright Test project, follow the Playwright Test installation instructions and run the following command:
- npm
- Yarn
- pnpm
npm init playwright@latest
yarn create playwright
pnpm create playwright
Expected output (example):
Getting started with writing end-to-end tests with Playwright:
Initialising project in '.'
✔ Do you want to use TypeScript or JavaScript? · TypeScript
✔ Where to put your end-to-end tests? · tests
✔ Add a GitHub Actions workflow? (y/N) · false
✔ Install Playwright browsers (can be done manually via 'npx playwright install')? (Y/n) · true
Using TypeScript improves code completion support in JetBrains IDEs and Visual Studio Code, reducing common coding errors.
Installing Serenity/JS
To add Serenity/JS to a Playwright Test project, install the following modules:
- npm
- Yarn
- pnpm
npm install --save-dev @serenity-js/core @serenity-js/console-reporter @serenity-js/playwright @serenity-js/playwright-test @serenity-js/rest @serenity-js/web @serenity-js/serenity-bdd
yarn add --dev @serenity-js/core @serenity-js/console-reporter @serenity-js/playwright @serenity-js/playwright-test @serenity-js/rest @serenity-js/web @serenity-js/serenity-bdd
pnpm add --save-dev @serenity-js/core @serenity-js/console-reporter @serenity-js/playwright @serenity-js/playwright-test @serenity-js/rest @serenity-js/web @serenity-js/serenity-bdd
This command installs:
@serenity-js/core@serenity-js/console-reporter@serenity-js/playwright@serenity-js/playwright-test@serenity-js/rest@serenity-js/web@serenity-js/serenity-bdd
To ensure that your version of Playwright Test is compatible with the latest version of Serenity/JS, check the Serenity/JS releases and compatibility page.
Configuration
Playwright Test uses the playwright.config.ts file to configure test scenarios, workers, and reporters.
Since Playwright runs tests in parallel across multiple Node.js processes,
reporters must be configured separately from test scenarios in the configuration file.
This section provides a step-by-step guide to the complete configuration setup.
Integrating Serenity/JS reporting
To integrate Serenity/JS reporting, modify the playwright.config.ts file as follows:
import { defineConfig, devices } from '@playwright/test'
import type { SerenityFixtures, SerenityWorkerFixtures } from '@serenity-js/playwright-test'

export default defineConfig<SerenityFixtures, SerenityWorkerFixtures>({
    reporter: [
        // Serenity/JS reporting services
        [ '@serenity-js/playwright-test', {
            crew: [
                '@serenity-js/console-reporter',
                [ '@serenity-js/serenity-bdd', {
                  specDirectory: './spec'
                } ],
                [ '@serenity-js/core:ArtifactArchiver', {
                  outputDirectory: './target/site/serenity'
                } ],
            ]
        }],

        // Any other native Playwright Test reporters
        [ 'html', { open: 'never' } ],
    ],

    // Other Playwright Test configuration options
});
This configuration enables the @serenity-js/playwright-test test runner adapter, which in turn configures the "stage crew" of Serenity/JS reporting services:
- Console reporter - Displays test results in the terminal.
- Serenity BDD reporter - Produces
jsonreports to be ingested by the Serenity BDD CLI and produce the living documentation. - Artifact Archiver - Stores the
jsonreports and screenshots captured by the Photographer to disk.
Note that the above configuration assumes the following directory structure of your project:
./spec- stores your test scenarios and is the top-most directory of your requirements hierarchy../target/site/serenity- stores any test report artifacts, like the.jsonfiles and screenshots.
If you'd like to use different locations for your tests or the test reports, adjust the specDirectory and outputDirectory settings accordingly.
Enabling automatic screenshots
Serenity/JS offers automatic screenshot capture for test scenarios using the Screenplay Pattern. This is handled by the Photographer service, which takes screenshots based on interactions and assertion failures performed by the Serenity/JS actors.
To enable automatic screenshot capture, add the @serenity-js/web:Photographer service to the crew array
in the appropriate use section of your playwright.config.ts configuration file.
There are three available scopes for configuring the Photographer:
testConfig.use- Global scope for all test scenarios.testProject.use- Project-specific scope that overrides global settings.test.use- Test file scope, which overrides both global and project configurations.
For example, to take screenshots only on assertion failures by default, but capture every interaction in the audit-trail test suite, configure your project as follows:
import { defineConfig, devices } from '@playwright/test'
import type { SerenityFixtures, SerenityWorkerFixtures } from '@serenity-js/playwright-test'

export default defineConfig<SerenityFixtures, SerenityWorkerFixtures>({
    reporter: [
        // ...
    ],

    // Global configuration for all test scenarios
    use: {
        crew: [
            // Automatically take screenshots upon an assertion failure
            ['@serenity-js/web:Photographer', { strategy: 'TakePhotosOfFailures' }]
        ],
        defaultActorName: 'Alice',
    },

    projects: [
        // Per-project configuration, overrides the global defaults.
        {
            name: 'audit-trail',
            testMatch: [
                '**/audit-trail/**/*.spec.ts',
            ],
            use: {
                ...devices['Desktop Chrome'],
                crew: [
                    // Automatically take screenshots of every actor interaction
                    ['@serenity-js/web:Photographer', { strategy: 'TakePhotosOfInteractions' }]
                ],
            },
        },
        // Other projects
    }

    // Other Playwright Test configuration options
});
You also have the option to configure the Photographer for individual test files. To do that, add the test.use
outside of any describe blocks.
import { describe, it, test } from '@serenity-js/playwright-test'

test.use({
  crew: [
    [ '@serenity-js/web:Photographer', { strategy: 'TakePhotosOfInteractions' } ]
  ]
})

describe('Checkout', () => {

    // test scenarios
})
Learn more about:
- Serenity/JS test fixtures and configuration options
- Serenity/JS test fixtures and configuration options
- Playwright Test configuration options
Writing tests
Serenity/JS is designed to integrate seamlessly with your existing Playwright Test codebase, even if you are not using the Screenplay Pattern yet. Additionally, the framework enables you to mix Screenplay and non-Screenplay scenarios within the same codebase, helping your team gradually adopt the pattern where appropriate.
In this section, you will learn how to write test scenarios using Playwright Test and Serenity/JS APIs and how to leverage actors to structure your test interactions.
Defining a test scenario
A typical Playwright Test scenario is defined using the test function imported from the @playwright/test module:
import { test, expect } from '@playwright/test'

test('todo list lets a guest user record a new todo', async ({ page }) => {

    await page.goto('https://todo-app.serenity-js.org/#/');

    await page.locator('.new-todo').fill('Read a book');
    await page.locator('.new-todo').press('Enter');

    await expect(page.locator('.view label')).toHaveText([ 'Read a book' ]);
});
To use Serenity/JS Screenplay Pattern APIs and benefit from in-depth reporting capabilities,
you need to import Serenity/JS test function instead of the default one:
- import { test, expect } from '@playwright/test'
+ import { test, expect } from '@serenity-js/playwright-test'

test('todo list lets a guest user record a new todo', async ({ page }) => {

    // ...
});
When migrating an existing test codebase, a great first step is to use the "find and replace" feature of your IDE to replace any @playwright/test imports
in your test scenarios with @serenity-js/playwright-test.
Grouping test scenarios
Apart from the default test function, the @serenity-js/playwright-test module
offers the more concise BDD-style syntax:
describe- Alias fortest.describe.it- Alias fortest.
To make the most of Serenity BDD reporting capabilities,
you should use a single outermost describe block to describe the component or feature being exercised by the scenarios in the test file.
You can then use as many nested describe blocks as necessary to group related scenarios within the test file.
import { describe, it, expect } from '@serenity-js/playwright-test'

// Feature or component name (matching the file name, see below)
describe('Todo App', () => {

    // One or more nested `describe` blocks grouping multiple scenarios by context
    describe('Guest user', () => {

        // Expected behaviour
        it('should start with an empty todo list', async ({ page }) => {
            // ...
        })

        it('should be able to record a new todo', async ({ page }) => {)
            // ...
        })
    })

    describe('Registered user', () => {

        it('should start with the last todo list they used', async ({ page }) => {
            // ...
        })

        // ...
    })
})
To ensure Serenity BDD correctly associates test results with test files and generates feature coverage reports, you must:
- Use one and only one outermost
describeblock per test file. - Ensure the outermost
describeblock name matches the test file name, e.g.'Todo App'andtodo_app.spec.ts.
Learn more about Serenity BDD best practices.
Using the Screenplay Pattern APIs
The Screenplay Pattern is an innovative, user-centred approach to writing high-quality automated acceptance tests. It promotes effective use of layers of abstraction, helps your test scenarios reflect the business vernacular of your domain, and encourages good testing and software engineering practices within your team.
Serenity/JS provides Playwright Test fixtures that automatically inject one or multiple actors into your scenarios. Each actor is automatically equipped with a set of abilities that enable them to interact with the system under test using the Serenity/JS Screenplay Pattern APIs. You can also create custom abilities and write your own implementations of Screenplay Pattern APIs to extend your actors’ capabilities.
To use the Screenplay Pattern APIs, import the relevant interactions and questions from the appropriate modules,
and instruct your actors to perform them using the actor.attemptsTo method.
The most commonly used Screenplay Pattern APIs come from the following modules:
@serenity-js/web- Provides web interactions portable across different web automation libraries, such as Playwright or WebdriverIO, as well as the Page Element Query Language APIs.@serenity-js/assertions- Provides universal assertions that work across different test runners and automation libraries.@serenity-js/rest- Provides RESTful API interactions for sending requests and inspecting responses.@serenity-js/playwright- Provides Playwright-specific interactions.@serenity-js/core- Provides interface-agnostic interactions, such as waiting and synchronisation, control flow, or logging.
Writing single-actor scenarios
If your test scenario requires a single actor, inject the default instance using the actor fixture:
import { describe, it, expect } from '@serenity-js/playwright-test'
import { Navigate, Text, PageElements, By } from '@serenity-js/web'
import { Ensure, equals } from '@serenity-js/assertions'

import { TodoApp } from './screenplay/TodoApp'

describe('Todo App', () => {

    describe('Guest user', () => {

        it('should start with an empty todo list', async ({ page, actor }) => {

            const recordedItems = () =>
                Text.ofAll(PageElements.located(By.css('.todo-list li')))
                    .describedAs('displayed items');

            await actor.attemptsTo(
                Navigate.to('https://todo-app.serenity-js.org/#/'),
                Ensure.that(TodoApp.recordedItems().count(), equals(0)),
            )
        })
    })
})
The default actor fixture is linked with the default page fixture, allowing you to use the actor model in your existing Playwright Test scenarios, even alongside the regular Playwright Test APIs.
Reusing interactions with tasks
One of the key benefits of using the Screenplay Pattern is that it allows you to use tasks to encapsulate and reuse sequences of interactions across multiple test scenarios. You can introduce tasks in-line in your test scenarios as you develop them, extract them into separate files, or organise them into classes to make your test scenarios more readable and maintainable.
Tasks can be composed of other tasks, allowing you to build complex sequences of interactions from smaller, reusable building blocks.
In the example below, we've extracted the interactions with the To-do App into a separate TodoApp class, but you can organise them in any way that makes sense for your project. Check out the "Design" chapter of this Handbook for inspiration.
import { describe, it, beforeEach } from '@serenity-js/playwright-test'
import { Navigate } from '@serenity-js/web'
import { Ensure, equals } from '@serenity-js/assertions'

import { TodoApp } from './screenplay/TodoApp'

describe('Todo App', () => {

    describe('Guest user', () => {

        beforeEach(async ({ actor }) => {
            await actor.attemptsTo(}
                Navigate.to('https://todo-app.serenity-js.org/#/'),
            )
        })

        it('should start with an empty todo list', async ({ actor }) => {

            await actor.attemptsTo(
                Ensure.that(TodoApp.recordedItems().count(), equals(0)),
            )
        })

        it('should be able to record a new todo', async ({ actor }) => {

            await actor.attemptsTo(
                TodoApp.recordItem('Read a book')
                Ensure.that(TodoApp.recordedItems(), equals([
                    'Read a book'
                ])),
            )
        })
    })
})
We've implemented the TodoApp class using private static methods to hide the implementation details of page elements and selectors used to identify interactive elements and public static methods to expose the tasks to the test scenarios.
import { PageElement, PageElements, By, Enter, Key, Press, Text } from '@serenity-js/web'
import { Task } from '@serenity-js/core'

class TodoApp {
    private static newTodoInput = () =>
        PageElement.located(By.css('.new-todo'))
            .describedAs('"What needs to be done?" input box');

    private static items = () =>
        PageElements.located(By.css('.todo-list li'))
            .describedAs('displayed items');

    static const recordItem = (name: string) =>
        Task.where(`#actor records an item called ${ name }`,
            Enter.theValue(name).into(this.newTodoInput()),
            Press.the(Key.Enter).in(this.newTodoInput()),
        )

    static const recordedItems = () =>
        Text.ofAll(this.items())
            .describedAs('displayed items');
}
To try this example out, check out the Serenity/JS Playwright Test Template on GitHub.
Changing the default actor name
You can change the name of the default actor by setting the defaultActorName configuration option in your playwright.config.ts file:
import { defineConfig, devices } from '@playwright/test'
import type { SerenityFixtures, SerenityWorkerFixtures } from '@serenity-js/playwright-test'

export default defineConfig<SerenityFixtures, SerenityWorkerFixtures>({
    // Global configuration for all test scenarios
    use: {
        defaultActorName: 'Alice',
    },

    projects: [
        // Per-project configuration, overrides the global defaults.
        {
            name: 'chromium',
            use: {
                ...devices['Desktop Chrome'],
                defaultActorName: 'Alice',
            },
        },
    }
    // ...
});
You can also set it directly in your test file via test.use:
import { describe, it, beforeEach, test } from '@serenity-js/playwright-test'
import { Navigate } from '@serenity-js/web'
import { Ensure, equals } from '@serenity-js/assertions'

import { TodoApp } from './screenplay/TodoApp'

describe('Todo App', () => {

    describe('Guest user', () => {

        test.use({
            defaultActorName: 'Guest',
        });

        beforeEach(async ({ actor }) => {
            await actor.attemptsTo(}
                Navigate.to('https://todo-app.serenity-js.org/#/'),
            )
        })

        it('should start with an empty todo list', async ({ actor }) => {

            await actor.attemptsTo(
                Ensure.that(TodoApp.recordedItems().count(), equals(0)),
            )
        })
    })
})
Writing multi-actor scenarios
The Screenplay Pattern is particularly useful when modelling interactions between multiple actors, each with their own responsibilities, and playing their role in the workflow. Examples include a buyer and a seller in an e-commerce scenario, a customer and a support agent in a customer service scenario, or a doctor and a patient in a healthcare scenario.
To inject multiple actors into your test scenario, use the actorCalled fixture:
import { describe, it, beforeEach } from '@serenity-js/playwright-test'
import { Navigate } from '@serenity-js/web'
import { Ensure, equals } from '@serenity-js/assertions'

import { TodoApp } from './screenplay/TodoApp'

describe('Todo App', () => {

    describe('Guest user', () => {

        it('shares the list with other guests using the same browser', async ({ actorCalled }) => {

            await actorCalled('Alice').attemptsTo(
                Navigate.to('https://todo-app.serenity-js.org/#/'),
                TodoApp.recordItem('Read a book')
                Ensure.that(TodoApp.recordedItems(), equals([
                    'Read a book'
                ])),
            )

            // By default, Alice and Bob use the same browser session
            // so Bob sees the same list as Alice

            await actorCalled('Bob').attemptsTo(
                Ensure.that(TodoApp.recordedItems(), equals([
                    'Read a book'
                ])),
            )
        })
    })
})
By default, all actors share the same browser session. To make them use independent browsers, see the Using multiple browsers section.
Modifying default abilities
Each actor comes with a set of abilities that enable them to interact with the system under test. By default, these abilities include:
BrowseTheWebWithPlaywright- Allows interaction with the browser using the defaultpagefixture.TakeNotes.usingAnEmptyNotepad()- Facilitates storing and retrieving information during the test run.CallAnApi- Enables interaction with RESTful APIs using an Axios HTTP client configured withbaseURL,extraHTTPHeaders, and proxy configuration derived from theproxyfixture.
An actor can only have one instance of each ability type at a time.
Therefore, providing a new instance of the same type via the actor.whoCan method overrides any existing ability of that type.
Overriding abilities inline
You can override the default abilities inline or add custom abilities
inline within a test scenario using the actor.whoCan method:
import { describe, it, beforeEach } from '@serenity-js/playwright-test'
import { TakeNotes, Notepad } from '@serenity-js/core'

describe('Todo App', () => {

    describe('actor', () => {

        it('can share notes with another actor', async ({ actor, actorCalled, browser }) => {

            const sharedNotepad = Notepad.empty()

            // Override the default actor's ability to take notes
            await actor
                .whoCan(TakeNotes.using(sharedNotepad))
                .attemptsTo(
                    // ...
                )

            // Create an extra actor with access to the same notepad
            // to allow for sharing data between actors
            await actorCalled('Bob')
                .whoCan(TakeNotes.using(sharedNotepad))
                .attemptsTo(
                    // ...
                )
        })
    })
})
Overriding abilities via test.use
To avoid adding or overriding abilities inline, you can define them via test.use and
using the extraAbilities fixture.
This approach enables you to reuse the same configuration for all the test scenarios within the given describe block.
import { describe, it, test } from '@serenity-js/playwright-test'
import { MyAbility } from './MyAbility'

describe('Todo App', () => {

    test.use({
        extraAbilities: [ new MyAbility() ]
    });

    // ...
})
Overriding abilities via useFixtures
When you have multiple test files that require the same customisations to your actor configuration or the same custom fixtures, you'll want to
centralise it in a file like serenity-api.ts and leverage the useFixtures function.
This function returns a test API, including functions such as describe, it, beforeEach, or test, which you can use instead of the default ones provided by the framework.
import { useFixtures } from '@serenity-js/playwright-test'
import { TakeNotes, Notepad } from '@serenity-js/core'

export interface MyNotes {
    testListId: string;
}

export interface TestScopeFixtures {
    notepad: Notepad<MyNotes>
}

export const { describe, it, beforeEach, test } = useFixtures<TestScopeFixtures>({
  notepad: Notepad.with<MyNotes>({
      testListId: process.env.TEST_LIST_ID,
  }),

  extraAbilities: async ({ notepad }, use) => {
      const extraAbilities = [
          TakesNotes.using(notepad),
      ];

      await use(extraAbilities);
  },
})
import { Navigate } from '@serenity-js/web'
import { notes, q } from '@serenity-js/core'

import { describe, it, beforeEach, test, type MyNotes } from './test-api.ts'

describe('Todo App', () => {

    it('uses shared notes', async ({ actor }) => {
        await actor.attemptsTo(
            Navigate.to(q`/lists/${ notes<MyNotes>().testListId }`),
            // ...
        )
    });

    // ...
})
Using multiple browsers
By default, scenarios with multiple actors reuse the same underlying page instance to align with Playwright Test defaults.
While this is useful for simulating multiple users interacting within the same browser session, it may not be appropriate for scenarios where different actors represent distinct users or roles.
For instance, a doctor and a patient using a healthcare system would not share the same browser session or user interface.
To address this, use the actor.whoCan method to override the default ability to BrowseTheWebWithPlaywright.
This allows actors who require a separate browser to have their own instance.
In this modified implementation below, Alice uses the default browser instance, associated with the page fixture,
while Bob uses a separate browser instance launched using the browser fixture.
import { describe, it, beforeEach } from '@serenity-js/playwright-test'
import { BrowseTheWebWithPlaywright } from '@serenity-js/playwright'
import { Navigate } from '@serenity-js/web'
import { Ensure, equals } from '@serenity-js/assertions'

import { TodoApp } from './screenplay/TodoApp'

describe('Todo App', () => {

    describe('Guest user', () => {


        it('does not share lists across browsers', async ({ actorCalled, browser }) => {

            await actorCalled('Alice').attemptsTo(
                Navigate.to('https://todo-app.serenity-js.org/#/'),
                TodoApp.recordItem('Read a book')
                Ensure.that(TodoApp.recordedItems(), equals([
                    'Read a book'
                ])),
            )

            await actorCalled('Bob')
                .whoCan(BrowseTheWebWithPlaywright.using(browser))
                .attemptsTo(
                    Navigate.to('https://todo-app.serenity-js.org/#/'),
                    Ensure.that(TodoApp.recordedItems(), equals([ ])),
                )
        })
    })
})
If your scenario requires more actors using separate browser instances, you can override the default ability to BrowseTheWeb for each actor in the same way.
Sharing notes between actors
By default, each actor receives an ability to TakeNotes using their own notepad.
To share notes between actors, you can introduce a notepad fixture and override the default actorCalled function to make the actors reuse the same notepad.
Overriding the actorCalled function allows you to customise the abilities of the actors created via the actorCalled fixture,
as well as the default actor injected via the actor fixture.
import { useFixtures } from '@serenity-js/playwright-test';
import { Notepad, notes, TakeNotes } from '@serenity-js/core';

export interface SharedNotes {
    items: string[];
}

export interface TestScopeFixtures {
    notepad: Notepad<SharedNotes>
}

export const { describe, it, beforeEach, afterEach, test }  = useFixtures<TestScopeFixtures>({

    // Shared notepad instantiated before each test
    notepad: async ({ }, use) => {

        // Create an empty notepad to share between actors
        const notepad = Notepad.empty<SharedNotes>()

        // Alternatively, pre-populate the notepad with some data
        // const notepad = Notepad.with<SharedNotes>({
        //     items: ['strawberries', 'bananas'],
        // })

        await use(notepad)
    },

    // Override the actorCalled fixture to use the shared notepad
    extraAbilities: async ({ notepad }, use) => {

        await use(actorName => {
            // Return the same set of extra abilities for all the actors,
            // or make it conditional based on the actorName
            return [
                TakeNotes.using(notepad),
            ]
        })
    },
})
import { notes } from '@serenity-js/core'
import { Ensure, equals } from '@serenity-js/assertions'
import { describe, it, SharedNotes } from './test-api'

describe('Todo App', () => {

    describe('actor', () => {

        it('can access a shared notepad', async ({ actor, actorCalled, browser }) => {

            // default actor
            await actor.attemptsTo(
                notes<SharedNotes>().set('items', [
                  'apples',
                  'oranges',
                ]),
            )

            // additional actor, sharing the same notes
            await actorCalled('Bobby').attemptsTo(
                Ensure.that(
                  notes<SharedNotes>().get('items'),
                  equals([
                    'apples',
                    'oranges',
                  ]),
                ),
            )
        })
    })
})
Replacing the default actors
For advanced Serenity/JS users, rather than modifying individual abilities, you can replace the default Cast of actors with a custom implementation.
For example, a custom cast can ensure each actor receives their own browser instance while sharing notes.
import { useFixtures } from '@serenity-js/playwright-test'
import { TakeNotes, Notepad } from '@serenity-js/core'

export interface MyNotes {
    testListId: string;
}

export const { describe, it, beforeEach, test } = useFixtures<{ notepad: Notepad<MyNotes> }>({
    notepad: Notepad.with<MyNotes>({
       testListId: process.env.TEST_LIST_ID,
    }),

    actors: async ({ browser, contextOptions, notepad }, use) => {
        const cast = Cast.where(actor => actor.whoCan(
            BrowseTheWebWithPlaywright.using(browser, {
                ...contextOptions,
                userAgent: `${ actor.name }`
            }),
            TakeNotes.using<MyNotes>(notepad),
        ))

        await use(cast)
    },
})
Overriding actors replaces the cast used to configure the actors instantiated via the actorCalled fixture, as well as the default actor injected via the actor fixture.
Reporting
Serenity/JS provides comprehensive reporting capabilities and integrates with both the Serenity BDD reporter and the native Playwright Test reporting tools. The framework supports:
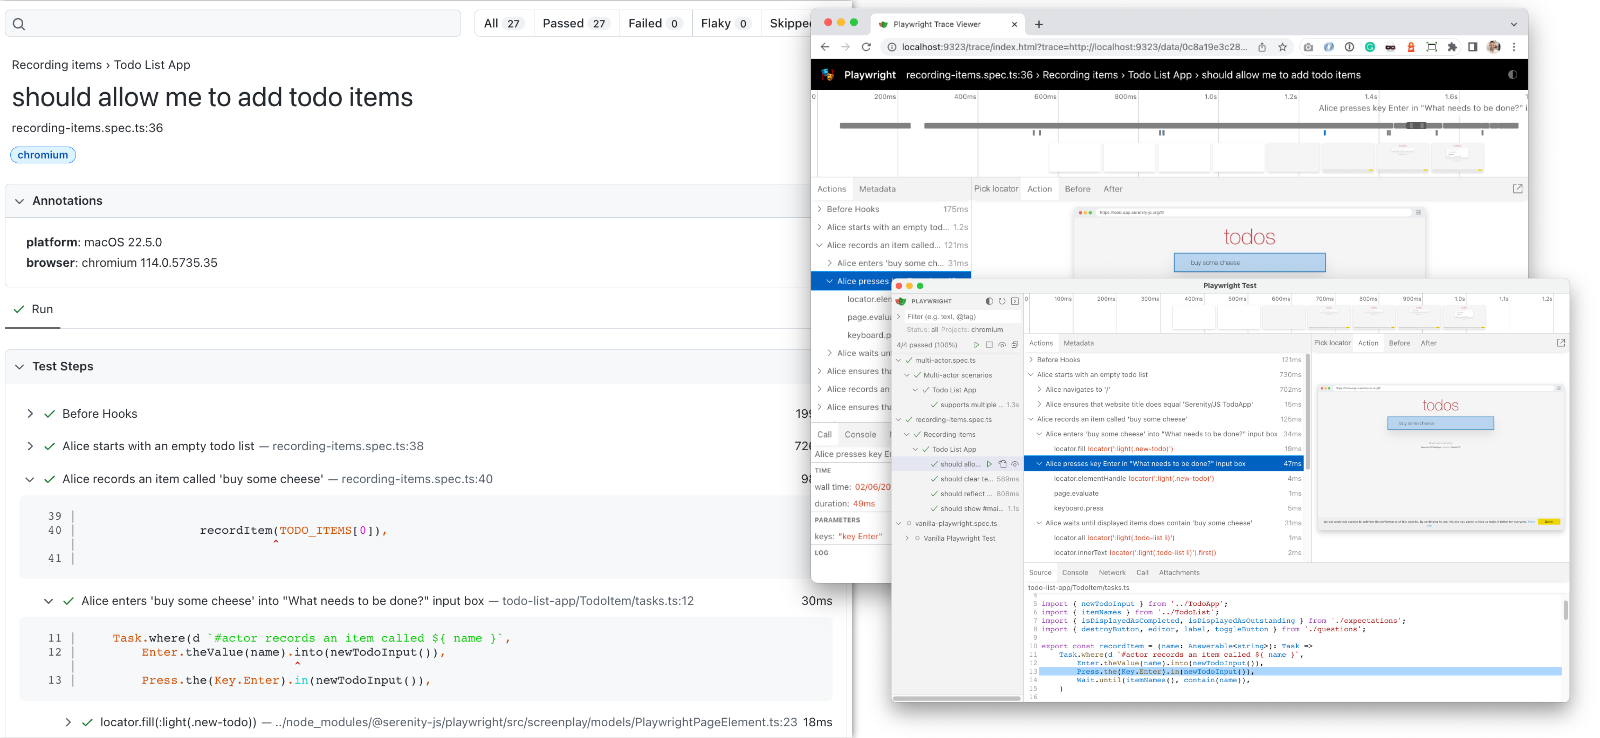
- Playwright Test HTML Reports - Enhanced with Screenplay Pattern activity details and automatic screenshots.
- Playwright Test UI Mode - Real-time test execution with Screenplay Pattern integration.
- Playwright Trace Viewer - Detailed test execution traces, including Screenplay Pattern activities.
- Serenity BDD Reports - Rich, business-focused living documentation of your system.
Serenity/JS supports both classic Playwright Test scenarios and those that follow the Screenplay Pattern, allowing you to migrate to Screenplay gradually if you wish, or mix and match the two implementations within the same codebase.
Explore the Serenity/JS + Playwright Test project template to see these reports in action:
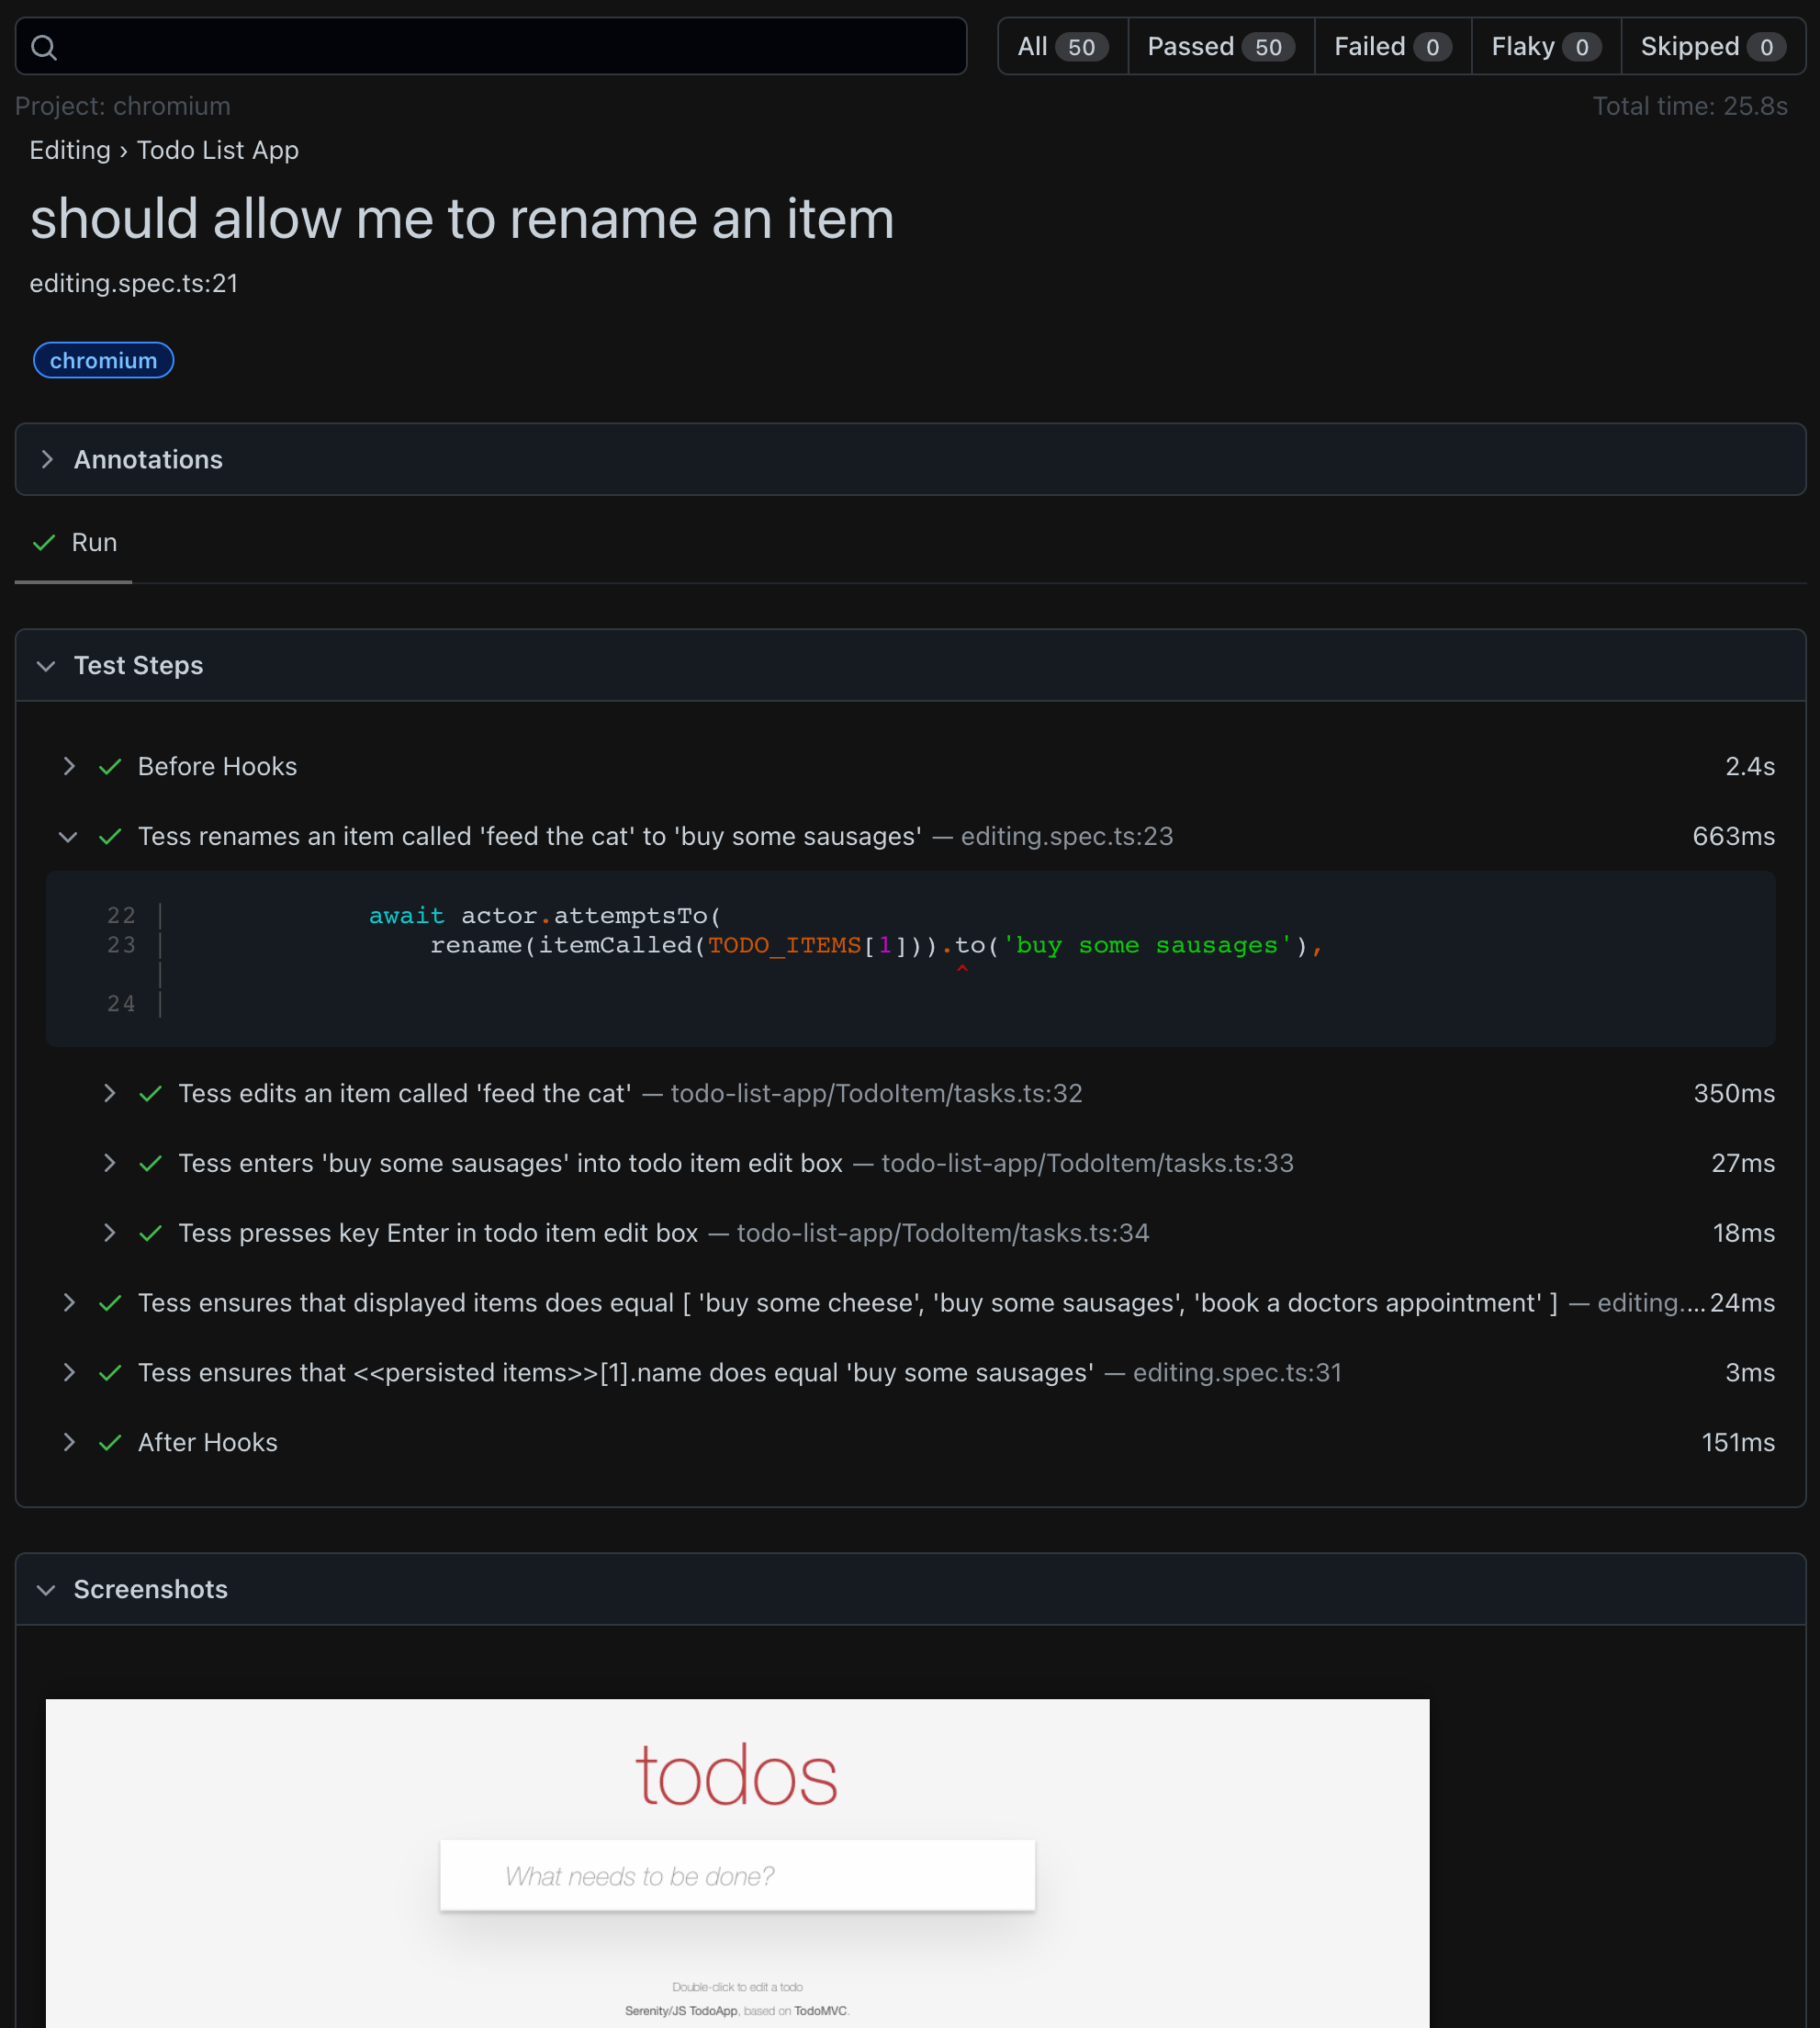
Playwright HTML reports
Serenity/JS automatically enhances the built-in Playwright HTML reports with information gathered from your Screenplay Pattern activities.
To enable integration with the Playwright HTML reporter, you need to:
- Use the Screenplay Pattern APIs in your Playwright Test scenarios.
- Configure the Playwright HTML reporter in your
playwright.config.tsfile.
import { defineConfig, devices } from '@playwright/test'
import type { SerenityFixtures, SerenityWorkerFixtures } from '@serenity-js/playwright-test'

export default defineConfig<SerenityFixtures, SerenityWorkerFixtures>({
    reporter: [
        // Enable Serenity/JS reporting services
        [ '@serenity-js/playwright-test', {
            crew: [
                '@serenity-js/console-reporter',
                [ '@serenity-js/serenity-bdd', {
                  specDirectory: './spec'
                } ],
                [ '@serenity-js/core:ArtifactArchiver', {
                  outputDirectory: './target/site/serenity'
                } ],
            ]
        }],

        // Enable Playwright Test HTML reporter
        [ 'html', { open: 'never' } ],
    ],

    // Other Playwright Test configuration options
})
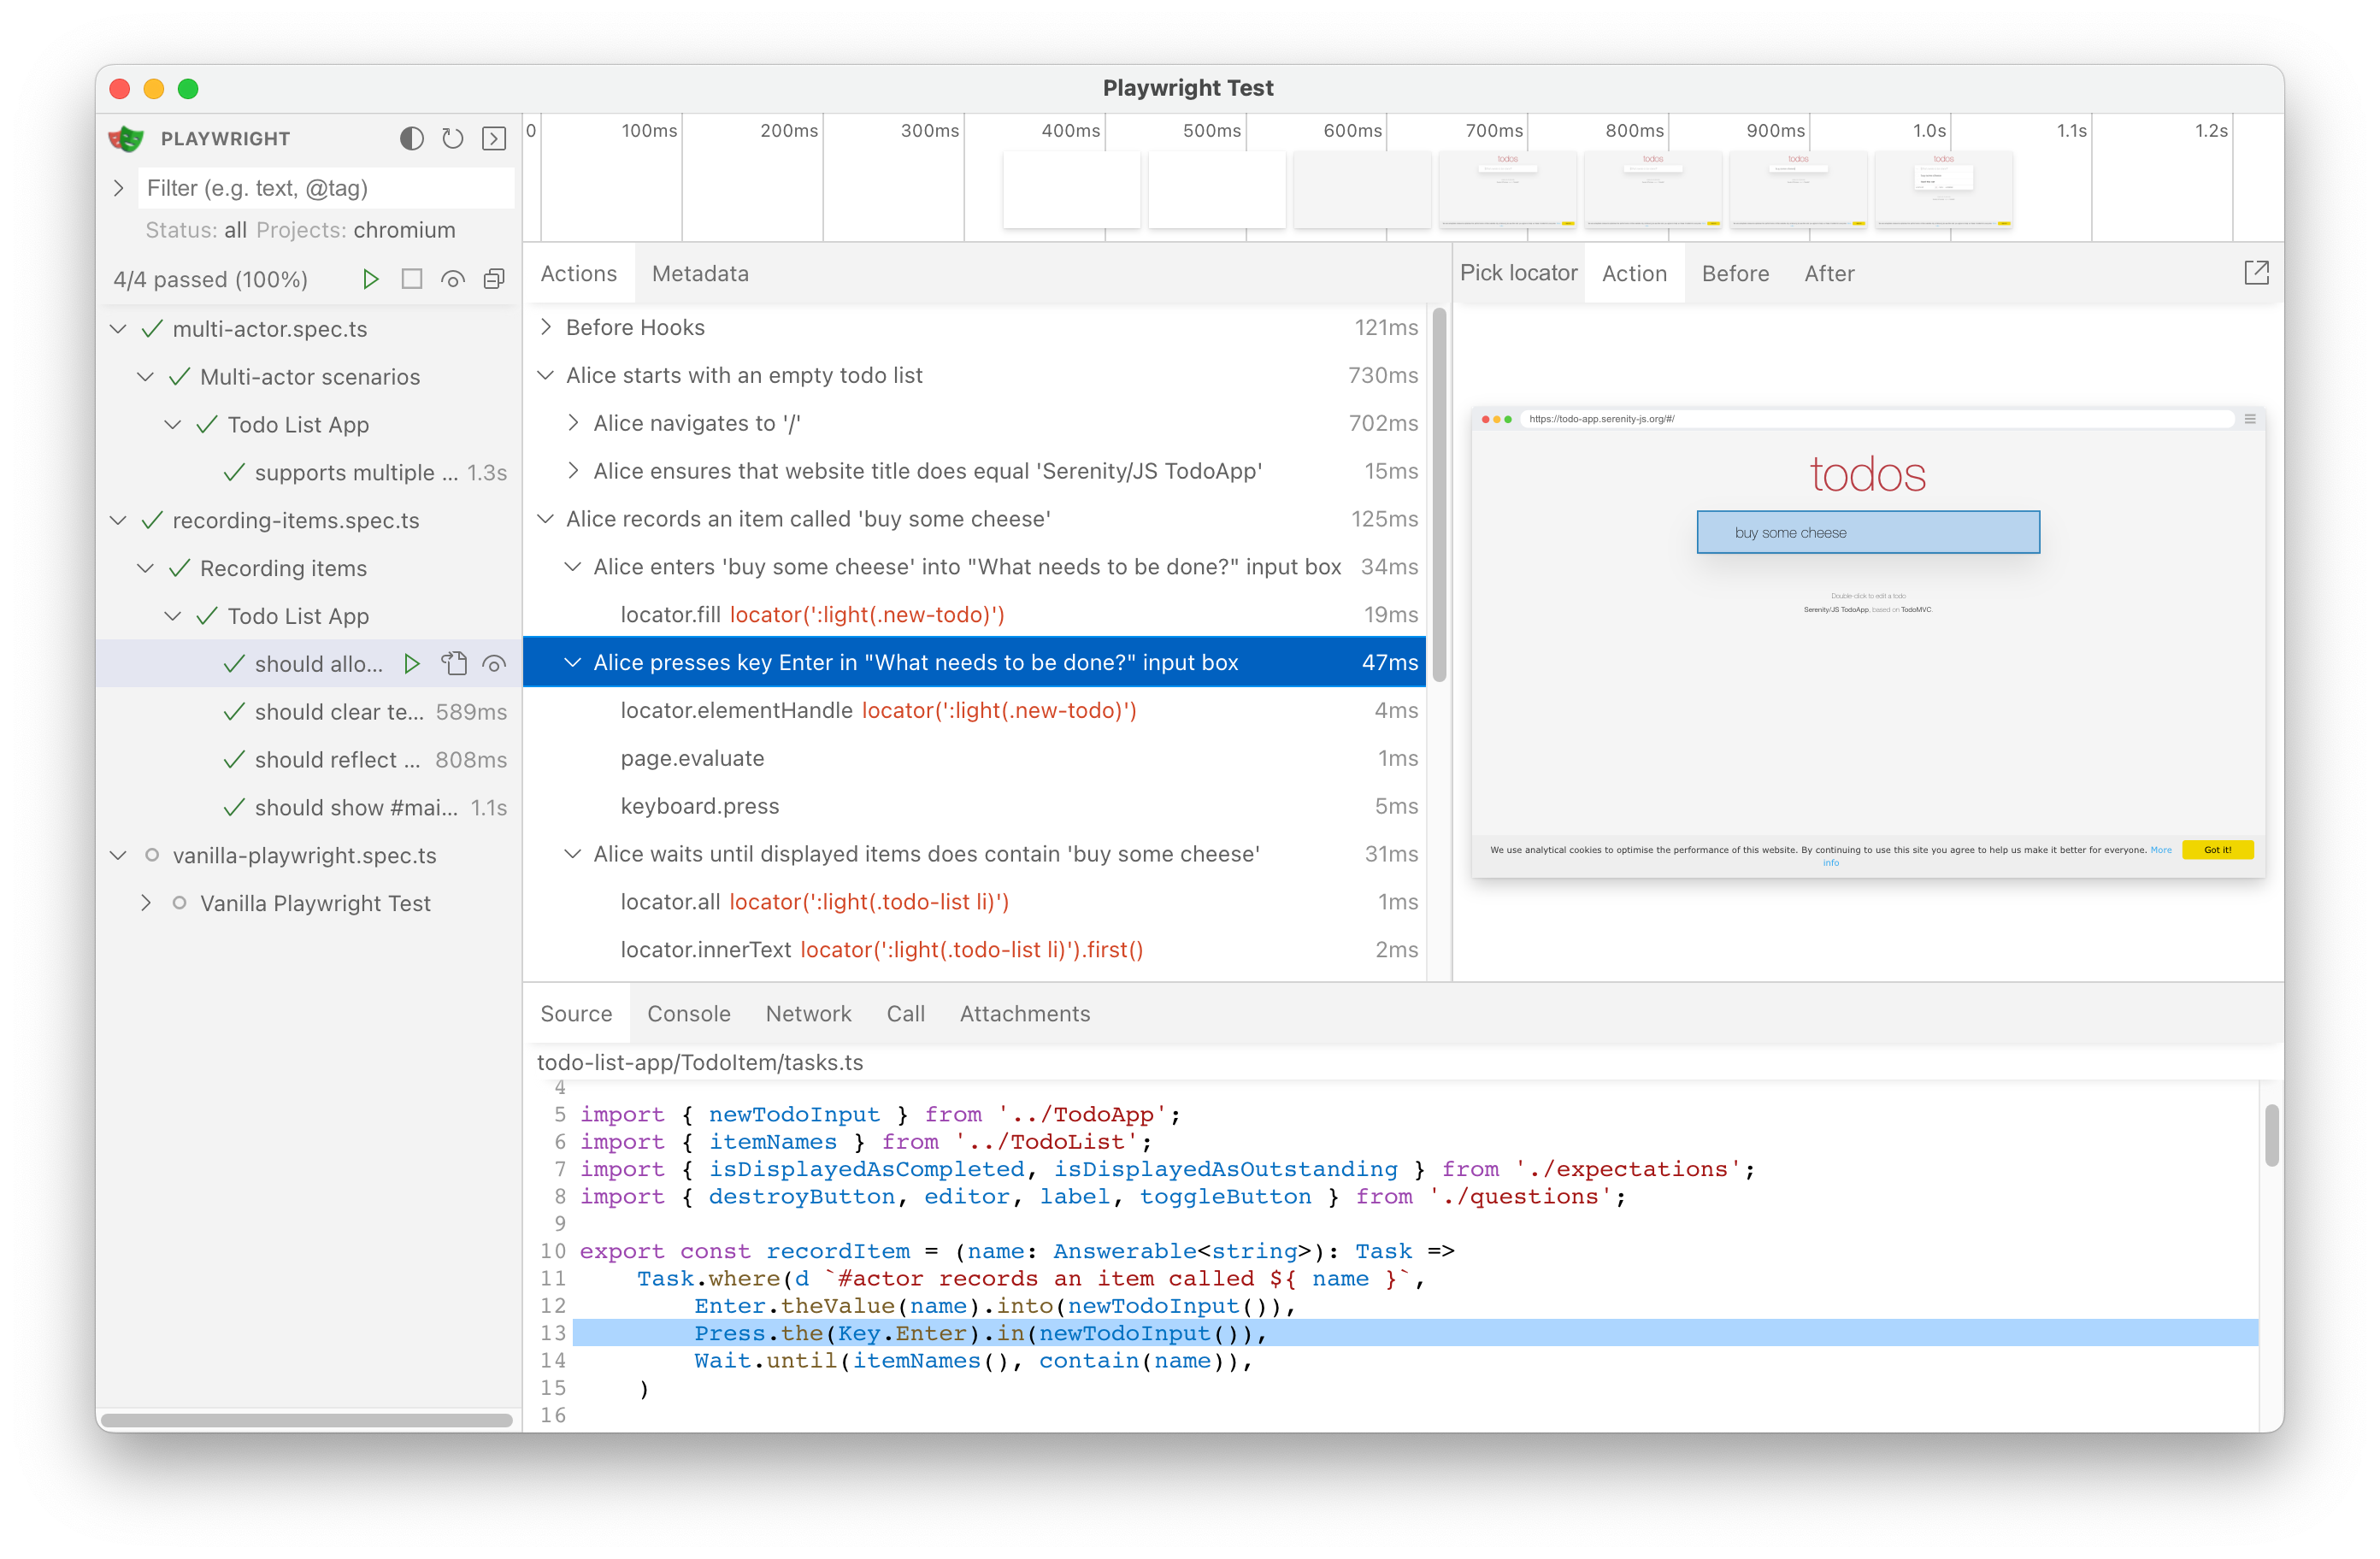
Playwright Test UI Mode
Serenity/JS integrates with Playwright Test UI Mode, displaying Screenplay Pattern activities in the test runner interface.
To use Playwright Test UI Mode, run the following command in your Playwright Test project:
npx playwright test --ui
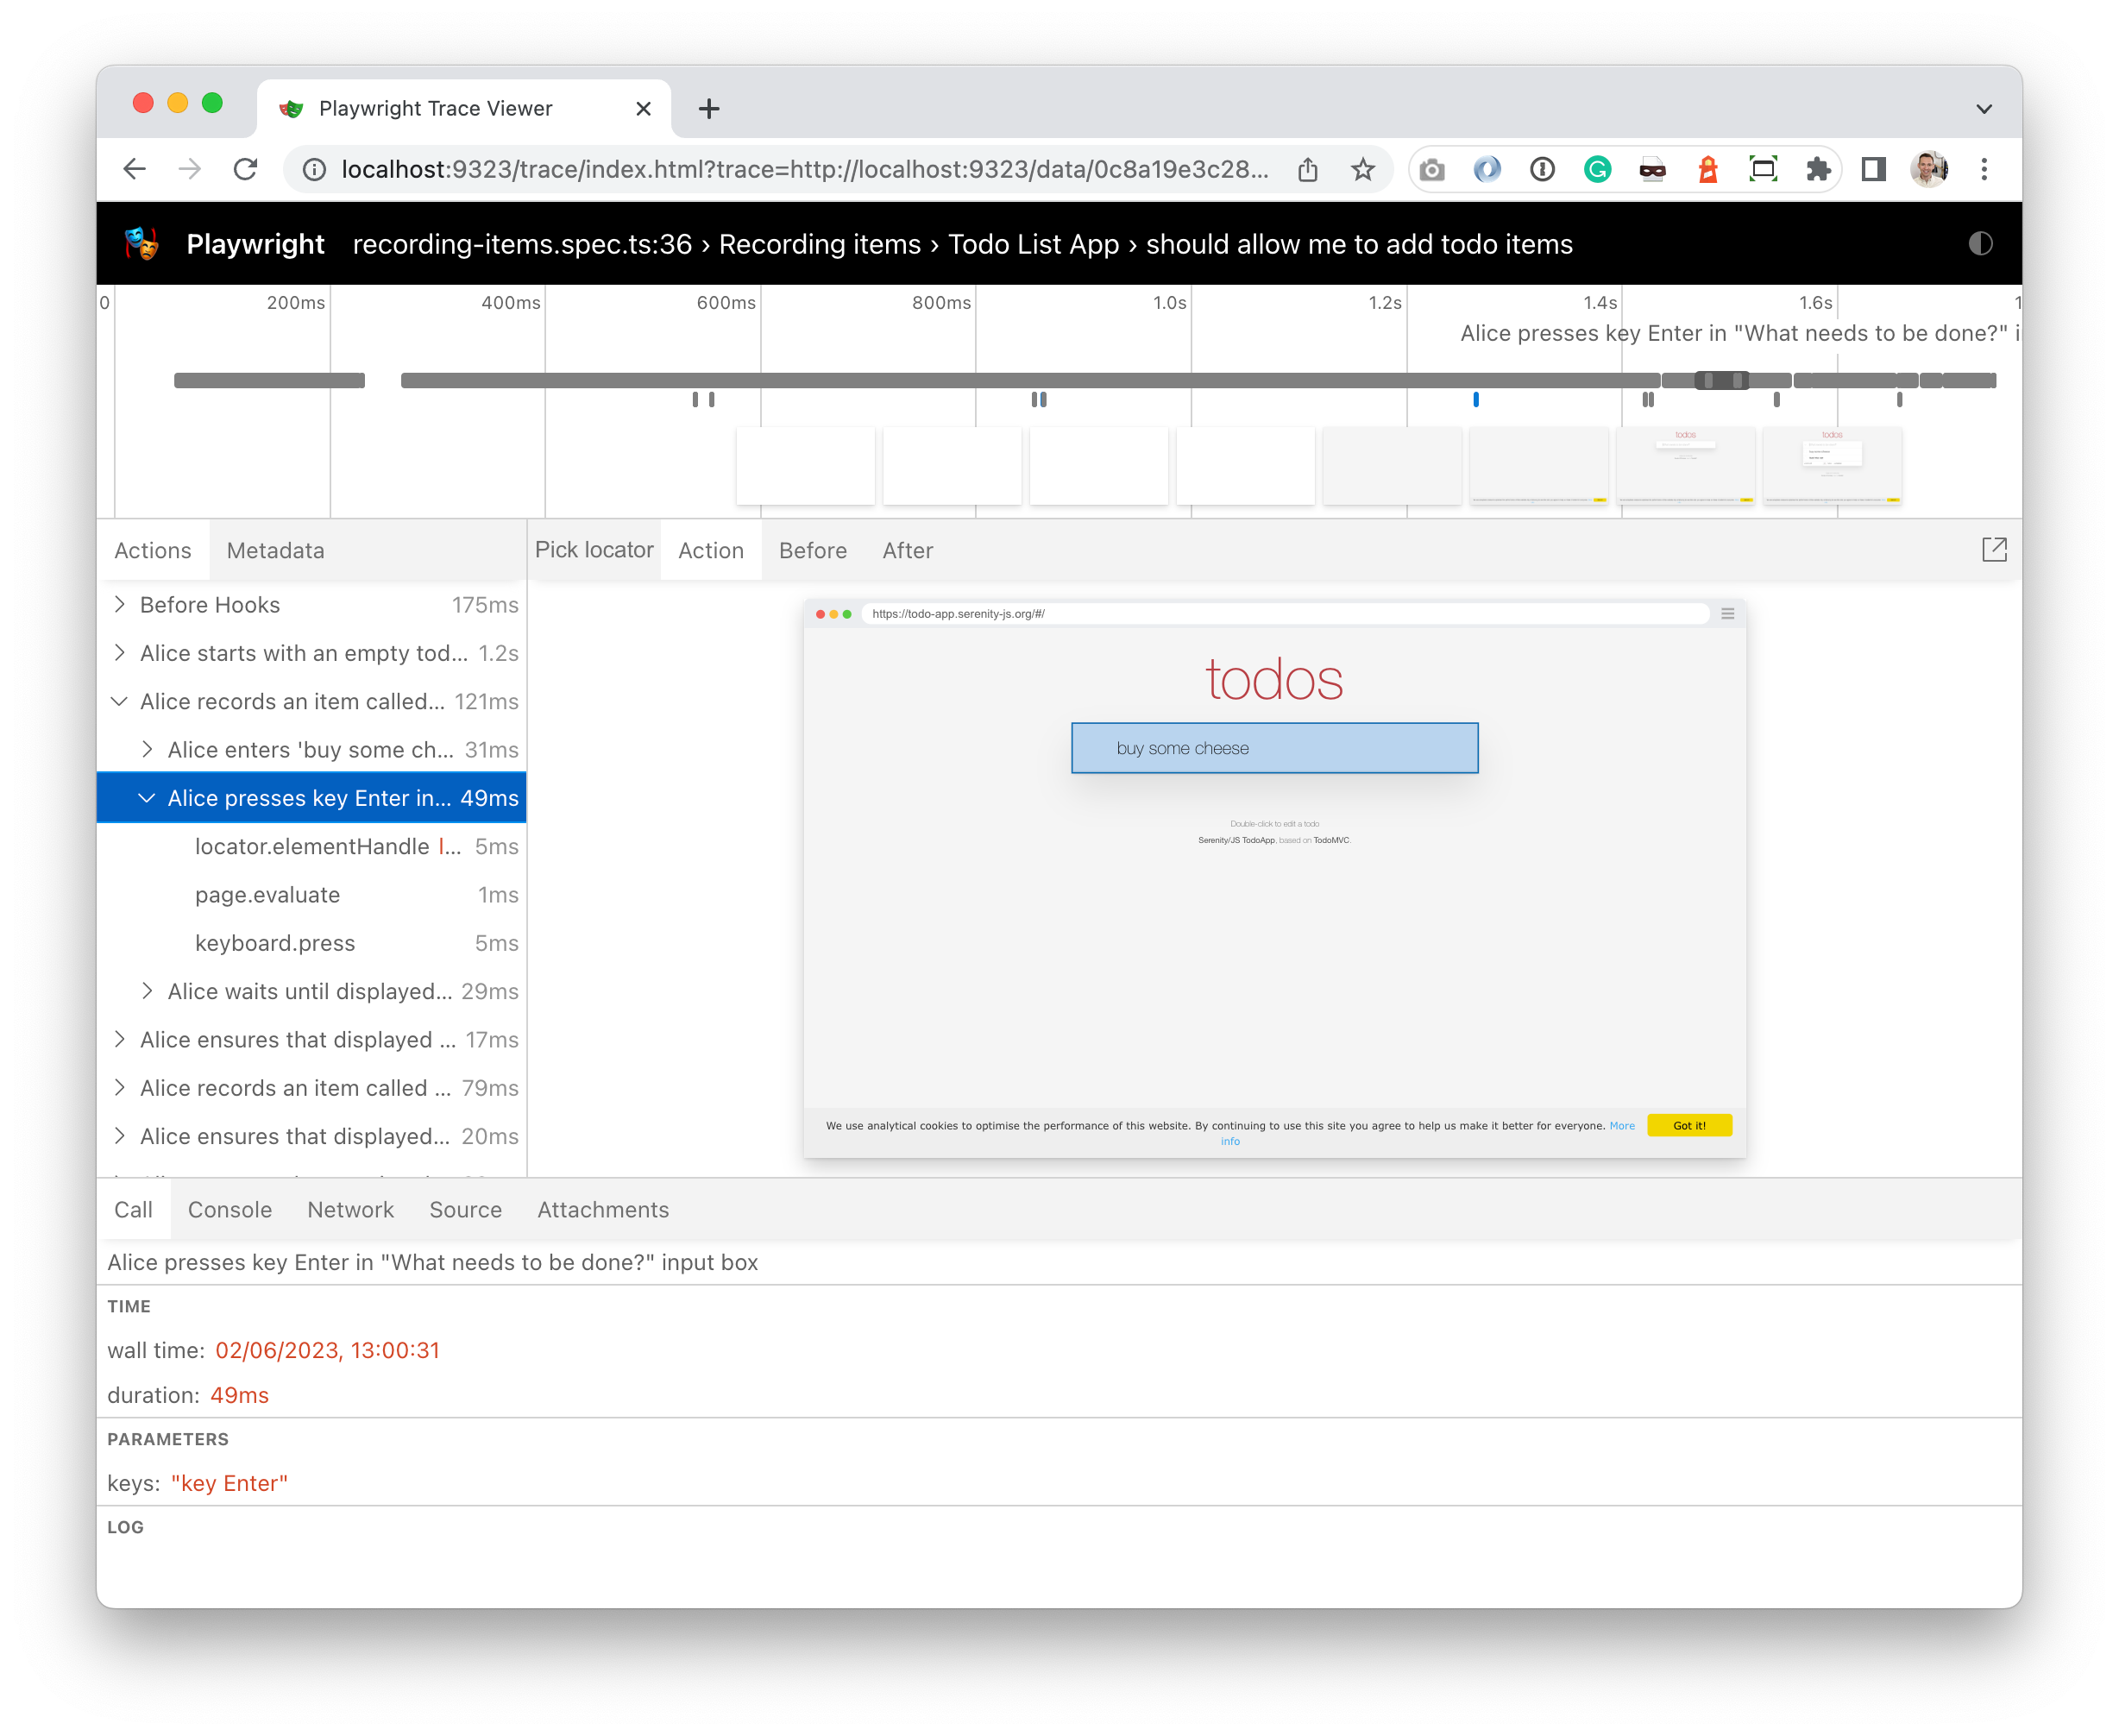
Using Playwright Test Trace Viewer
Your Screenplay Pattern activities automatically appear in the Playwright Test Trace Viewer.
To use this feature, you need to:
- Use the Screenplay Pattern APIs in your Playwright Test scenarios.
- Enable tracing in your
playwright.config.tsfile.
import { defineConfig, devices } from '@playwright/test'
import type { SerenityFixtures, SerenityWorkerFixtures } from '@serenity-js/playwright-test'

export default defineConfig<SerenityFixtures, SerenityWorkerFixtures>({
  use: {
    trace: 'on-first-retry',     // or 'on', 'retain-on-failure'
  },
})
Serenity BDD Reports
Serenity reports and living documentation are a powerful feature enabled by Serenity BDD. They aim not only to report test results, but also to document how features are tested, and what your application does.
Serenity BDD reports are generated by the Serenity BDD CLI,
a Java program that ships with the @serenity-js/serenity-bdd module.
These reports are based on the json reports produced by the Serenity BDD Reporter,
as well as screenshots captured by the Photographer.
To generate Serenity BDD HTML reports and living documentation, your test suite must:
- Use
SerenityBDDReporterandArtifactArchiveras per the configuration instructions. - Invoke the
serenity-bdd runcommand when the test run has finished to generate the Serenity BDD report.
All Serenity/JS Project Templates follow the same recommended pattern to generate Serenity BDD reports. This approach relies on:
- NPM scripts to invoke the command-line tools, such as Playwright Test or the Serenity BDD CLI.
npm-failsafeto execute a sequence of NPM scripts.rimrafto remove any test reports left over from the previous run.
You can install these additional recommended modules as follows:
- npm
- Yarn
- pnpm
npm install --save-dev npm-failsafe rimraf
yarn add --dev npm-failsafe rimraf
pnpm add --save-dev npm-failsafe rimraf
Next, add the following convenience scripts to your package.json file:
clean- removes any test reports left over from the previous test run.test- usesnpm-failsafeto execute multiple NPM scripts and generate test reports.test:execute- an example alias forplaywright test. You can extend it to include any necessary command-line arguments.test:report- an alias forserenity-bdd run. You can configure it with alternativejsonreport locations (--source) and HTML report destinations (--destination). Runnpx serenity-bdd run --helpto see the available options.
{
  "scripts": {
    "clean": "rimraf target",
    "test": "failsafe clean test:execute test:report",
    "test:execute": "playwright test",
    "test:report": "serenity-bdd run --source ./target/site/serenity --destination ./target/site/serenity",
  }
}
To learn more about the SerenityBDDReporter, see:
SerenityBDDReporterAPI documentation and configuration examples.- Serenity/JS + Playwright Test project template on GitHub
- Serenity/JS examples on GitHub
Advanced usage - Chaining NPM scripts
A common advanced usage pattern for systems with multiple test suites is to execute each test suite separately on CI across multiple pipeline stages, while running them sequentially in a local environment. In both cases, a single Serenity BDD report is generated at the end. This pattern is particularly useful for systems with multiple Playwright Test projects or those that use both the Playwright Component Test runner and the Playwright Test runner.
To implement this pattern, define an NPM script for each project and the report generation step, then use npm-failsafe to chain the NPM scripts for local execution.
{
  "scripts": {
    "build": "esbuild src/app.tsx ...",
    "test": "failsafe test:clean test:ct build test:e2e test:report",
    "test:clean": "rimraf target",
    "test:ct": "playwright test-ct --config playwright-ct.config.ts",
    "test:e2e": "playwright test --config playwright.config.ts",
    "test:report": "serenity-bdd run --source ./target/site/serenity --destination ./target/site/serenity",
  }
}
npm-failsafe enables additional advanced usage and configuration patterns, such as passing runtime
parameters to your NPM scripts. See the npm-failsafe documentation for examples.
Integration architecture
To recap, Serenity/JS integrates with Playwright Test through the @serenity-js/playwright-test module,
which acts as a test runner adapter and:
- Captures test execution events from Playwright Test
- Translates them into Serenity/JS domain events
- Makes them available to Serenity/JS reporting services
This modular architecture enables Serenity/JS to enhance both classic Playwright Test scenarios and those following the Screenplay Pattern with advanced reporting capabilities.
To enable this integration, you need to:
- Configure Serenity/JS test runner adapter and reporting services in your
playwright.config.tsfile - Optionally, use the Serenity/JS test fixtures to enable Screenplay Pattern APIs in your Playwright Test scenarios
Next steps
Well done, your Playwright Test codebase is now integrated with Serenity/JS! 🎉🎉🎉
To take things further, check out:
- Your first web scenario (Serenity/JS + Playwright Test tutorial)
- The Screenplay Pattern
- Serenity/JS Web Testing Patterns
- Serenity/JS Playwright project templates
- Serenity/JS Web API docs
- Serenity/JS Assertions API docs
- Serenity/JS examples on GitHub
- 📚 Our book, "BDD in Action, Second Edition"
Remember, new features, tutorials, and demos are coming soon! Follow Serenity/JS on LinkedIn, subscribe to Serenity/JS channel on YouTube and join the Serenity/JS Community Chat to stay up to date!
Don't forget to ⭐️ Serenity/JS on GitHub to help others discover the framework!

