WebdriverIO
WebdriverIO is a versatile framework for automating tests of modern web and mobile applications. WebdriverIO leverages the power of the WebDriver and WebDriver-BiDi protocols, developed and supported by all major browser vendors and thus guarantees a true cross-browser testing experience.
Serenity/JS revolutionises automated testing by enabling your team to write expressive, maintainable tests that align with your unique domain. Seamlessly integrating with WebdriverIO and test runners like Mocha, Cucumber, and Jasmine, Serenity/JS also offers advanced reporting that provides clear insights into test results, helping both technical teams and business stakeholders understand the quality of the system under test.
Benefits of integrating Playwright Test with Serenity/JS:
- Enhanced Reporting - Gain visually rich reports and living documentation with Serenity BDD.
- Reusable Code - Leverage the Screenplay Pattern to write portable, maintainable tests that streamline collaboration.
- Integration Libraries - Interact seamlessly with REST APIs, local Node.js servers, and verify complex workflows with ready-to-use integration libraries.
In this guide, you will learn how to:
- Set up a new Serenity/JS + WebdriverIO project
- Add Serenity/JS integration and reporting modules to new or existing WebdriverIO projects.
- Implement WebdriverIO Test scenarios using Serenity/JS Screenplay Pattern APIs and the Serenity/JS WebdriverIO module.

Quick start 🚀
To start testing immediately, consider using:
- Serenity/JS Project Templates for WebdriverIO - Pre-configured with essential dependencies.
- Serenity/JS GitHub Codespaces - Ready-to-use cloud-based development environments.
- Serenity/JS reference implementations on GitHub.
To see Serenity/JS reporting in action, explore the live reports generated by the Serenity/JS + WebdriverIO Project Templates:
| Framework | Project Template | Live Report |
|---|---|---|
| Serenity/JS + Cucumber + WebdriverIO | Project Template | Live Report |
| Serenity/JS + Mocha + WebdriverIO | Project Template | Live Report |
| Serenity/JS + Jasmine + WebdriverIO | Project Template | Live Report |
Installation
To use Serenity/JS with WebdriverIO Test, follow the Serenity/JS installation guide to set up your development environment and core runtime dependencies. Then, create a new WebdriverIO project or add Serenity/JS integration and reporting modules to an existing project.
Initialising a WebdriverIO project
To use the WebdriverIO CLI wizard to create a new project, run the following command in your computer terminal:
- npm
- Yarn
- pnpm
npm init wdio ./my-project
yarn create wdio ./my-project
pnpm create wdio ./my-project
To create a Serenity/JS project, select the following options:
- Type of testing: E2E Testing
- Automation backend: any - Serenity/JS supports both local and remote WebdriverIO test runners; select local to keep it simple
- Environment: web
- Browser: any - Serenity/JS supports all browsers supported by WebdriverIO; selecting Chrome is a good starting point
- Framework: Jasmine with Serenity/JS, Mocha with Serenity/JS, or Cucumber with Serenity/JS
- Compiler: any - Serenity/JS supports both TypeScript and JavaScript; we recommend TypeScript for better tooling support
- Generate test files: yes, if you'd like Serenity/JS to give you a starting point for your test scenarios
- Test file location: accept the defaults unless you'd like to store your code in a different directory
- Test reporter: any, Serenity/JS configures the project to use Serenity/JS reporting services, and you can add native WebdriverIO reporters too if needed
- Plugins/add-ons/services: none; Serenity/JS doesn't require any additional plugins to work with WebdriverIO
Using TypeScript improves code completion support in JetBrains IDEs and Visual Studio Code, reducing common coding errors.
For a step-by-step demonstration of creating a new project using the WebdriverIO CLI wizard, check out the below video:
Using Serenity/JS Project Templates
Serenity/JS Project Templates combine the most popular configurations of Serenity/JS modules, integration, and test tools, and include a handful of test scenarios to help you get started. All the official Serenity/JS Project Templates are available on GitHub, complete with GitHub Actions configuration, VisualStudio Code settings, and configured to publish test reports to GitHub Pages.
You can use them as a reference implementation or as a starting point for your project.
To create a new project from a Serenity/JS Project Template, click on the "Generate new project" link on the Serenity/JS Project Templates page, or click on the "Use this template" button on the template's GitHub repository page.
Learn more:
Adding Serenity/JS to an existing project
To add Serenity/JS to an existing WebdriverIO project, you'll need to install the required Serenity/JS modules and configure the WebdriverIO test runner to use Serenity/JS framework and reporting services.
Compatibility
Serenity/JS is compatible with:
- WebdriverIO 8 and 9
- Recent maintenance and active LTS versions of Node.js 22.12 and 24
- Latest major versions of Jasmine and Mocha
- All major versions of Cucumber
If your existing project dependencies are older than the above, you'll need to update them first to ensure compatibility. For more information on compatibility with external tools, consult the Serenity/JS compatibility matrix.
Installing Serenity/JS core and reporting modules
To add Serenity/JS to a WebdriverIO project, install the following modules:
- npm
- Yarn
- pnpm
npm install --save-dev @serenity-js/core @serenity-js/console-reporter @serenity-js/webdriverio @serenity-js/rest @serenity-js/web @serenity-js/serenity-bdd
yarn add --dev @serenity-js/core @serenity-js/console-reporter @serenity-js/webdriverio @serenity-js/rest @serenity-js/web @serenity-js/serenity-bdd
pnpm add --save-dev @serenity-js/core @serenity-js/console-reporter @serenity-js/webdriverio @serenity-js/rest @serenity-js/web @serenity-js/serenity-bdd
This command installs:
@serenity-js/core@serenity-js/console-reporter@serenity-js/rest@serenity-js/web@serenity-js/serenity-bdd@serenity-js/webdriveriocompatible with WebdriverIO 9 (replace with@serenity-js/webdriverio-8if you're using WebdriverIO 8)
Installing Serenity/JS test runner adapter
WebdriverIO offers a local runner that uses Jasmine, Mocha, or Cucumber test runners to run your test scenarios. Depending on the test runner you use, you'll need the appropriate Serenity/JS test runner adapter.
Serenity/JS with Cucumber
To use Serenity/JS and WebdriverIO with Cucumber.js, install the @serenity-js/cucumber adapter module:
- npm
- Yarn
- pnpm
npm install --save-dev @serenity-js/cucumber
yarn add --dev @serenity-js/cucumber
pnpm add --save-dev @serenity-js/cucumber
Please note that Serenity/JS WebdriverIO / Cucumber integration supports both Serenity/JS reporting services and native Cucumber.js reporters.
Serenity/JS with Jasmine
To use Serenity/JS and WebdriverIO with Jasmine, install the @serenity-js/jasmine adapter module:
- npm
- Yarn
- pnpm
npm install --save-dev @serenity-js/jasmine
yarn add --dev @serenity-js/jasmine
pnpm add --save-dev @serenity-js/jasmine
Serenity/JS with Mocha
To use Serenity/JS and WebdriverIO with Mocha, install the @serenity-js/mocha adapter module:
- npm
- Yarn
- pnpm
npm install --save-dev @serenity-js/mocha
yarn add --dev @serenity-js/mocha
pnpm add --save-dev @serenity-js/mocha
Configuration
Serenity/JS uses the standard WebdriverIO wdio.conf.ts configuration file, with an additional property called serenity for
specifying Serenity/JS configuration.
To integrate WebdriverIO with Serenity/JS, ensure that your wdio.conf.ts file:
- sets the
frameworkoption to@serenity-js/webdriverio(or@serenity-js/webdriverio-8for WebdriverIO 8), - configures Serenity/JS reporting services under the
serenity.crewoption, - optionally, sets the
serenity.runneroption tomocha,jasmine, orcucumberto match your preferred test runner.
This section provides a step-by-step guide to the complete configuration setup.
Integrating Serenity/JS reporting
Serenity/JS offers automatic screenshot capture for test scenarios using the Screenplay Pattern. This is handled by the Photographer service, which takes screenshots based on interactions and assertion failures performed by the Serenity/JS actors.
To integrate Serenity/JS reporting and enable automatic screenshot capture, modify the wdio.conf.ts file as follows:
- Cucumber
- Mocha
- Jasmine
import { WebdriverIOConfig } from '@serenity-js/webdriverio'

export const config: WebdriverIOConfig = {
    // Serenity/JS configuration
    framework: '@serenity-js/webdriverio',
    serenity: {
        runner: 'cucumber',
        crew: [
            // Optional, print test execution results to standard output
            '@serenity-js/console-reporter',

            // Optional, produce Serenity BDD reports
            // and living documentation (HTML)
            [ '@serenity-js/serenity-bdd', {
              specDirectory: './features'
            } ],

            [ '@serenity-js/core:ArtifactArchiver', {
              outputDirectory: './target/site/serenity'
            } ],
            // Optional, automatically capture screenshots
            // upon interaction failure
            [ '@serenity-js/web:Photographer', {
                strategy: 'TakePhotosOfFailures'
            } ],
        ],
    },

    specs: [
        './features/**/*.feature'
    ],

    cucumberOpts: {
        require: [
            './features/support/*.ts',
            './features/step-definitions/*.ts'
        ],
        // <string> (name) specify the profile to use
        profile: '',
        // <boolean> fail if there are any undefined or pending steps
        strict: false,
        // <string[] | string> (expression) only execute the features or scenarios with tags matching the expression
        tags: [],
        // <number> timeout for step definitions
        timeout: 60_000,
    },
};
import { WebdriverIOConfig } from '@serenity-js/webdriverio'

export const config: WebdriverIOConfig = {
    // Serenity/JS configuration
    framework: '@serenity-js/webdriverio',
    serenity: {
        runner: 'mocha',
        crew: [
            // Optional, print test execution results to standard output
            '@serenity-js/console-reporter',

            // Optional, produce Serenity BDD reports
            // and living documentation (HTML)
            [ '@serenity-js/serenity-bdd', {
              specDirectory: './test/specs'
            } ],

            [ '@serenity-js/core:ArtifactArchiver', {
              outputDirectory: './target/site/serenity'
            } ],
            // Optional, automatically capture screenshots
            // upon interaction failure
            [ '@serenity-js/web:Photographer', {
                strategy: 'TakePhotosOfFailures'
            } ],
        ],
    },

    specs: [
        './test/specs/**/*.spec.ts'
    ],

    mochaOpts: {
        ui: 'bdd',
        timeout: 60000,
        reporterOptions: {
            specDirectory: 'test/specs'
        },
    },
};
import { WebdriverIOConfig } from '@serenity-js/webdriverio'

export const config: WebdriverIOConfig = {
    // Serenity/JS configuration
    framework: '@serenity-js/webdriverio',
    serenity: {
        runner: 'jasmine',
        crew: [
            // Optional, print test execution results to standard output
            '@serenity-js/console-reporter',

            // Optional, produce Serenity BDD reports
            // and living documentation (HTML)
            [ '@serenity-js/serenity-bdd', {
              specDirectory: './test/specs'
            } ],

            [ '@serenity-js/core:ArtifactArchiver', {
              outputDirectory: './target/site/serenity'
            } ],
            // Optional, automatically capture screenshots
            // upon interaction failure
            [ '@serenity-js/web:Photographer', {
                strategy: 'TakePhotosOfFailures'
            } ],
        ],
    },

    specs: [
        './test/specs/**/*.spec.ts'
    ],

    jasmineOpts: {
        defaultTimeoutInterval: 60000,
        specDir: 'test/specs',
    },
};
This configuration enables the @serenity-js/protractor test runner adapter, which in turn configures the "stage crew" of Serenity/JS reporting services:
- Console reporter - Displays test results in the terminal.
- Serenity BDD reporter - Produces
jsonreports to be ingested by the Serenity BDD CLI and produce the living documentation. - Photographer - Automatically captures screenshots of the browser upon interactions or assertion failures when configured with
TakePhotosOfInteractionsorTakePhotosOfFailures, respectively. - Artifact Archiver - Stores the
jsonreports and screenshots captured by the Photographer to disk.
Note that the above configuration assumes the following directory structure of your project:
./test/specsor./features- stores your test scenarios and is the top-most directory of your requirements hierarchy../target/site/serenity- stores any test report artifacts, like the.jsonfiles and screenshots.
If you'd like to use different locations for your tests or the test reports, adjust the specDirectory and outputDirectory settings accordingly.
Learn more about the configuration options for your test runner:
| Test Runner | Configuration Options | Complete wdio.conf.ts |
|---|---|---|
| Cucumber | Serenity/JS Cucumber configuration options | Cucumber Protractor Template config |
| Jasmine | Serenity/JS Jasmine configuration options | Jasmine Protractor Template config |
| Mocha | Serenity/JS Mocha configuration options | Mocha Protractor Template config |
Using WebdriverIO 9 configuration
To use the new WebdriverIO 9 configuration types, combine them with the WithSerenityConfig interface
instead of using the default WebdriverIOConfig:
import { WithSerenityConfig } from '@serenity-js/webdriverio'

export const config: WebdriverIO.Config & WithSerenityConfig = {
    // ... Serenity/JS configuration
}
Writing test scenarios
Serenity/JS is designed to integrate seamlessly with your existing WebdriverIO codebase, even if you are not using the Screenplay Pattern yet. Additionally, the framework enables you to mix Screenplay and non-Screenplay scenarios within the same codebase, helping your team gradually adopt the pattern where appropriate.
In this section, you will learn how to write test scenarios using WebdriverIO and Serenity/JS APIs and how to leverage actors to structure your test interactions.
Using the Screenplay Pattern APIs
The Screenplay Pattern is an innovative, user-centred approach to writing high-quality automated acceptance tests. It promotes effective use of layers of abstraction, helps your test scenarios reflect the business vernacular of your domain, and encourages good testing and software engineering practices within your team.
To use the Screenplay Pattern APIs, import the relevant interactions and questions from the appropriate modules,
and instruct your actors to perform them using the actor.attemptsTo method.
The most commonly used Screenplay Pattern APIs come from the following modules:
@serenity-js/web- Provides web interactions portable across different web automation libraries, such as Playwright or WebdriverIO, as well as the Page Element Query Language APIs.@serenity-js/assertions- Provides universal assertions that work across different test runners and automation libraries.@serenity-js/rest- Provides RESTful API interactions for sending requests and inspecting responses.@serenity-js/webdriverio- Provides WebdriverIO-specific interactions.@serenity-js/core- Provides interface-agnostic interactions, such as waiting and synchronisation, control flow, or logging.
Using Serenity/JS actors
A test scenario following the Screenplay Pattern models workflows of one or multiple actors representing people and external systems interacting with the system under test.
When you register @serenity-js/webdriverio as your WebdriverIO framework, Serenity/JS automatically configures
a default cast of actors where every actor, where every actor has the abilities to:
To do so, Serenity/JS equips your actors with abilities to:
BrowseTheWebWithWebdriverIO.using(browser)- Allows interaction with the browser using the globalbrowserobject.TakeNotes.usingAnEmptyNotepad()- Facilitates storing and retrieving information during the test run.CallAnApi- Enables interaction with RESTful APIs using an Axios HTTP client configured with configured withbaseUrl.
An actor can only have one instance of each ability type at a time.
Therefore, providing a new instance of the same type via the actor.whoCan method overrides any existing ability of that type
To use an actor in your test scenario, refer to it using the actorCalled or actorInTheSpotlight functions
and they'll automatically use the configured cast of actors to create or retrieve the actor you need.
import { actorCalled } from '@serenity-js/core'
import { Navigate, Page } from '@serenity-js/web'
import { Ensure, includes } from '@serenity-js/assertions'

describe('Example', () => {

    it('can have test scenarios that follow the Screenplay Pattern', async () => {
        await actorCalled('Alice').attemptsTo(
            Navigate.to(`https://webdriver.io`),
            Ensure.that(
                Page.current().title(),
                includes(`Next-gen browser and mobile automation test framework for Node.js`)
            ),
        )
    })

    it('can have non-Screenplay scenarios too', async () => {
        await browser.url('https://webdriver.io')
        await expect(browser)
            .toHaveTitle('WebdriverIO · Next-gen browser and mobile automation test framework for Node.js | WebdriverIO')
    })
})
With Serenity/JS, you can also mix Screenplay and non-Screenplay scenarios in the same test suite and even in the same spec file. This enables you to introduce test scenarios that follow the Screenplay Pattern even to an existing test suite that doesn't use the Screenplay Pattern yet.
To learn more about the Screenplay Pattern and using Serenity/JS actors, check out:
- The Screenplay Pattern
- Serenity/JS Web Testing Patterns
- Using Serenity/JS actors with Cucumber
- Using Serenity/JS actors with Jasmine
- Using Serenity/JS actors with Mocha
- 📚 Our book, "BDD in Action, Second Edition"
Replacing the default actors
If you need to replace the default cast of actors, you can do so
by providing a custom implementation via serenity.actors
configuration option in your wdio.conf.ts.
For example, you might want to introduce an actor called Adam, the test data admin, who can make HTTP requests to the admin API,
but doesn't need to use the browsers. Conversely, you might want your other actors to use the browser but not the admin API.
import { Actor, Cast, TakeNotes } from '@serenity-js/core'
import { CallAnApi } from '@serenity-js/rest'
import { BrowseTheWebWithWebdriverIO } from '@serenity-js/webdriverio'

export class MyActors implements Cast {

    // Inject custom parameters via constructor
    constructor(private readonly adminApiUrl: string) {
    }

    prepare(actor: Actor): Actor {
        // You can assign abilities based on actor name, env variables, and so on
        switch (actor.name) {
            case 'Adam':
                return actor.whoCan(
                    CallAnApi.at(this.adminApiUrl)
                )

            default:
                return actor.whoCan(
                    BrowseTheWebWithWebdriverIO.using(global.browser as WebdriverIO.Browser),
                    TakeNotes.usingAnEmptyNotepad(),
                )
        }
    }
}
WebdriverIO doesn't allow you to use the browser global variable in wdio.conf.ts.
That's why you need to create a custom implementation of Cast
and only refer to browser in Cast.prepare method.
Next, modify your WebdriverIO configuration file to provide your custom MyActors implementation:
import { WebdriverIOConfig } from '@serenity-js/webdriverio'
import { MyActors } from './test/serenity/MyActors'

export const config: WebdriverIOConfig = {
    framework: '@serenity-js/webdriverio',
    serenity: {
        actors: new MyActors('https://admin-api.example.org'),
        crew: [
            '@serenity-js/console-reporter',
            '@serenity-js/serenity-bdd',
            [ '@serenity-js/core:ArtifactArchiver', { outputDirectory: 'target/site/serenity' } ],
        ],
    },
}
Reporting
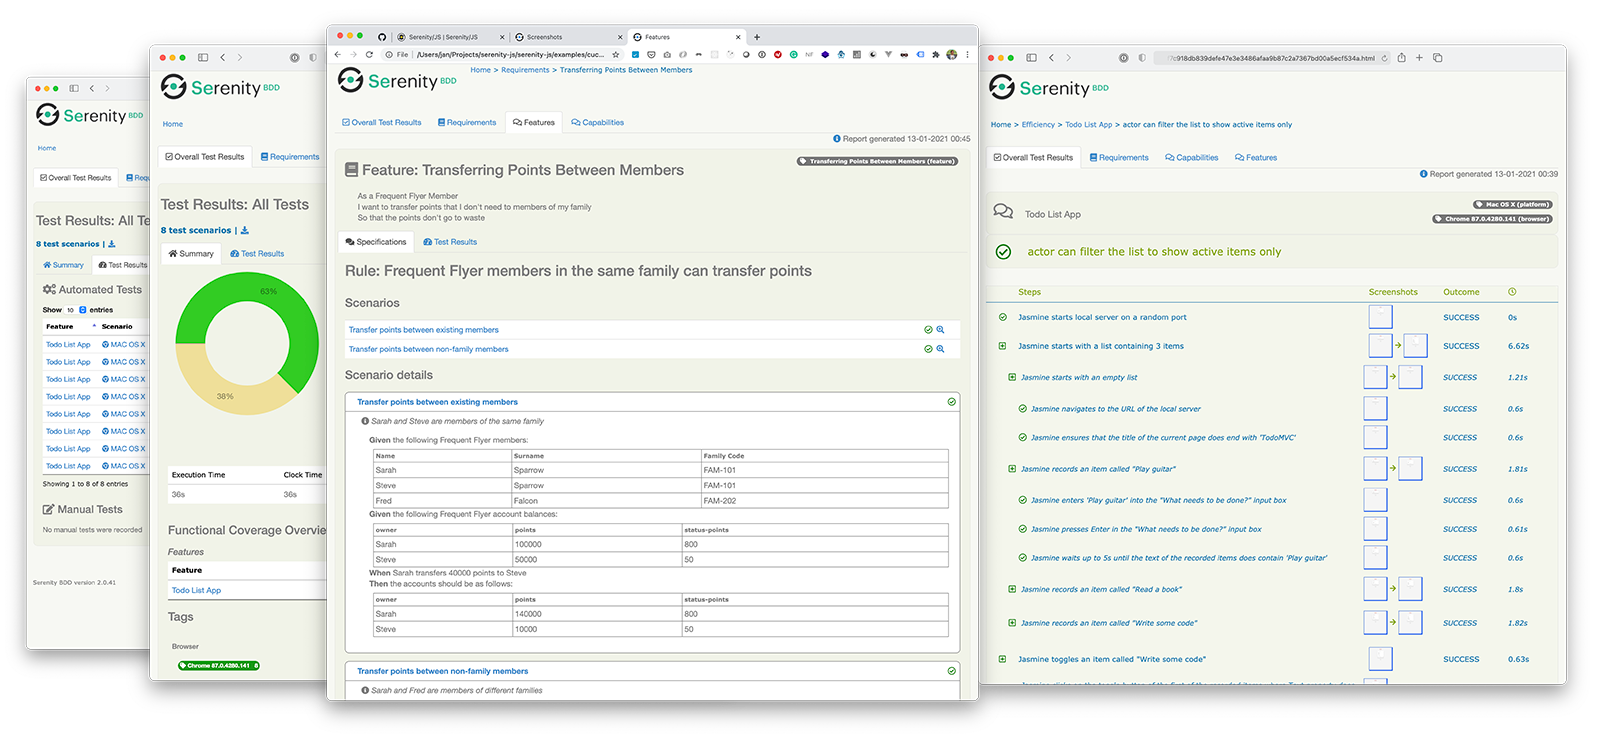
Serenity/JS provides comprehensive reporting capabilities and integrates with the Serenity BDD reporter.
Explore the Serenity/JS + WebdriverIO project templates to see the reporting capabilities in action.
Serenity BDD Reports
Serenity reports and living documentation are a powerful feature enabled by Serenity BDD. They aim not only to report test results, but also to document how features are tested, and what your application does.
Serenity BDD reports are generated by the Serenity BDD CLI,
a Java program that ships with the @serenity-js/serenity-bdd module.
These reports are based on the json reports produced by the Serenity BDD Reporter,
as well as screenshots captured by the Photographer.
To generate Serenity BDD HTML reports and living documentation, your test suite must:
- Use
SerenityBDDReporterandArtifactArchiveras per the configuration instructions. - Invoke the
serenity-bdd runcommand when the test run has finished to generate the Serenity BDD report.
All Serenity/JS Project Templates follow the same recommended pattern to generate Serenity BDD reports. This approach relies on:
- NPM scripts to invoke the command-line tools, such as Playwright Test or the Serenity BDD CLI.
npm-failsafeto execute a sequence of NPM scripts.rimrafto remove any test reports left over from the previous run.
You can install these additional recommended modules as follows:
- npm
- Yarn
- pnpm
npm install --save-dev npm-failsafe rimraf
yarn add --dev npm-failsafe rimraf
pnpm add --save-dev npm-failsafe rimraf
Next, add the following convenience scripts to your package.json file:
clean- removes any test reports left over from the previous test run.test- usesnpm-failsafeto execute multiple NPM scripts and generate test reports.test:execute- an example alias forprotractor. You can extend it to include any necessary command-line arguments.test:report- an alias forserenity-bdd run. You can configure it with alternativejsonreport locations (--source) and HTML report destinations (--destination). Runnpx serenity-bdd run --helpto see the available options.
{
  "scripts": {
    "clean": "rimraf target",
    "test": "failsafe clean test:execute test:report",
    "test:execute": "protractor ./protractor.conf.js",
    "test:report": "serenity-bdd run --source ./target/site/serenity --destination ./target/site/serenity",
  }
}
When your test run finishes, test results will be available in the target/site/serenity directory.
To view them, open the index.html file in your preferred web browser.
To avoid naming conflicts with any existing test script, projects created using the WebdriverIO CLI wizard come pre-configured with a serenity script that runs your tests and generates the reports:
npm run serenity
To learn more about the SerenityBDDReporter, see:
SerenityBDDReporterAPI documentation and configuration examples.- Serenity/JS WebdriverIO project templates
- Serenity/JS examples on GitHub
Upgrading to WebdriverIO 9
WebdriverIO 9 deprecated or removed several configuration options common in WebdriverIO 8 projects.
To upgrade your WebdriverIO 8-based Serenity/JS project:
- update the
@serenity-js/*,webdriverioand any@wdio/*modules to the latest version, - update your
tsconfig.jsonto targetes2022, - replace the deprecated configuration properties with the new ones,
- install the updated modules.
Updating dependencies
To update your dependencies, use a tool like npm-check-updates.
The command below will modify your package.json to update all @serenity-js/*, webdriverio, and @wdio/* modules to the latest version.
The command won't install the modules themselves (we'll do this last):
npx -y npm-check-updates '/@serenity-js|webdriverio|@wdio/' -u
Please also note that WebdriverIO 9 no longer provides the devtools and @wdio/devtools-service modules as they're no longer required.
If you had them in your package.json, you should remove them.
Updating TypeScript configuration
Update compilerOptions configuration in your tsconfig.json to target es2022:
{
  "compilerOptions": {
-   "target": "es2021",
-   "lib": ["es2021", "dom"],
+   "target": "es2022",
+   "lib": ["es2022", "dom"],
    "module": "CommonJS",
    "moduleResolution": "node",
    "types": [
      "node",
      "@wdio/globals/types"
    ],
  }
}
Updating WebdriverIO configuration
Modify your wdio.conf.ts to:
- remove the deprecated
automationProtocoloption, - replace the removed
autoCompileOptswithtsConfigPath.
import { WebdriverIOConfig } from '@serenity-js/webdriverio'

export const config: WebdriverIOConfig {

-  automationProtocol: 'devtools',

-  autoCompileOpts: { ... }
+  tsConfigPath: './tsconfig.json',
}
If you'd like to use one of the new WebdriverIO 9 configuration types, combine it with the WithSerenityConfig interface:
import { WithSerenityConfig } from '@serenity-js/webdriverio'

export const config: WebdriverIO.Config & WithSerenityConfig = {
    // ...
}
Installing updated modules
Finally, install the updated modules:
npm install
Integration architecture
To recap, Serenity/JS integrates with WebdriverIO through the @serenity-js/webdriverio module,
which acts as a test runner adapter and:
- Captures test execution events from WebdriverIO and its test runners
- Translates them into Serenity/JS domain events
- Makes them available to Serenity/JS reporting services
This modular architecture enables Serenity/JS to enhance both classic WebdriverIO scenarios and those following the Screenplay Pattern with advanced reporting capabilities.
To enable this integration, you need to:
- Configure Serenity/JS test runner adapter and reporting services in your
wdio.conf.tsfile - Optionally, use the Serenity/JS Screenplay Pattern APIs in your test scenarios
Next steps
Well done, your WebdriverIO test suite is now integrated with Serenity/JS! 🎉🎉🎉
To take things further, check out:
- Web testing with Serenity/JS
- Serenity/JS examples on GitHub
- Serenity/JS WebdriverIO project templates
- Serenity/JS API docs
Remember, new features, tutorials, and demos are coming soon! Follow Serenity/JS on LinkedIn, subscribe to Serenity/JS channel on YouTube and join the Serenity/JS Community Chat to stay up to date!
Don't forget to ⭐️ Serenity/JS on GitHub to help others discover the framework!

