Serenity BDD Reporter
Serenity reports are a powerful feature enabled by Serenity BDD. They aim not only to report test results, but also to document how features are tested, and what your application does.
@serenity-js/serenity-bdd module enables integration between Serenity/JS and the Serenity BDD reporting CLI.
You will learn:
- How to install Serenity BDD
- How to configure Serenity BDD reporter
- How to generate Serenity BDD reports
Module overview
@serenity-js/serenity-bdd module:
- Gathers information about your test execution,
- Analyses your test directory structure to understand your requirements hierarchy,
- Produces Serenity BDD-standard JSON reports,
- Provides and runs the Serenity BDD CLI - a Java program that turns the JSON reports into HTML reports and living documentation.
Examples and Project Templates
If you'd like to dive straight into the code, Serenity/JS GitHub provides:
- Serenity/JS project templates, which are the easiest way to start with the framework
- Examples and reference implementations, each set up to produce a Serenity BDD report
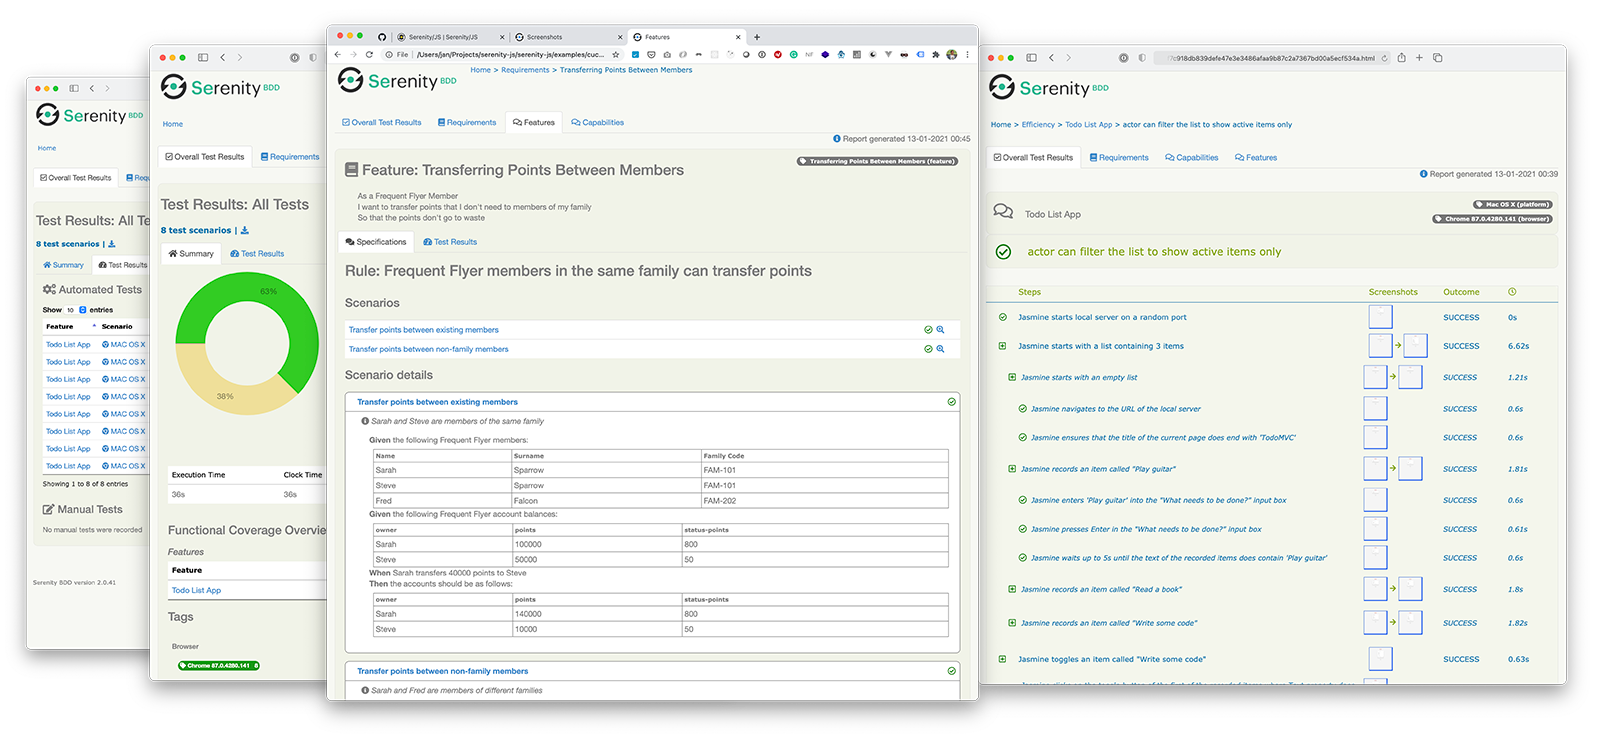
All the Serenity/JS project templates produce Serenity BDD reports and publish them to their GitHub Pages. Have a look at the example Serenity BDD report, generated by the Serenity/JS + Cucumber + Playwright project template.
Installation
First, install and configure a Serenity/JS test runner adapter for your test runner of choice.
Next, add the @serenity-js/serenity-bdd module to your project by running the following command in your computer terminal:
- npm
- Yarn
- pnpm
npm install --save-dev @serenity-js/serenity-bdd
yarn add --dev @serenity-js/serenity-bdd
pnpm add --save-dev @serenity-js/serenity-bdd
If you're starting a new project or need a reference implementation, consider using one of the Serenity/JS Project Templates as they all come with pre-configured test runner adapters and built-in support for Serenity BDD reporting.
As of Serenity/JS 3.30.0, @serenity-js/serenity-bdd module ships with the Serenity BDD CLI .jar file, so you no longer need to download it separately.
Configuration overview
To make your project produce Serenity BDD reports, you need to:
- Use a Serenity/JS test runner adapter to emit domain events that describe what happened during test execution,
- Use the
SerenityBDDReporter"stage crew member" to translate those events into Serenity BDD-standard JSON reports, - Use the
ArtifactArchiverto store the JSON reports to disk, - Run the Serenity BDD CLI when the test run completes.
In this section, we'll show you how to configure the Serenity BDD reporter for the most popular test runners supported by Serenity/JS.
Configuring the test runner adapter
Serenity/JS needs to know where your test scenarios are located to analyse your requirements hierarchy.
The framework automatically detects conventional locations, such as features, specs, spec, tests, test or src subdirectories of your project.
If your project uses a different directory structure, you should configure your Serenity/JS test runner adapter
to point to your desired location by specifying the specDirectory property.
Consult the Serenity BDD Best Practices section to learn more about how your project directory structure can help you produce better test reports.
Configuring the Serenity BDD reporter
To produce the Serenity BDD-standard JSON reports, your test runner adapter should use the SerenityBDDReporter stage crew member.
While the different test runners might have a slightly different configuration syntax,
the SerenityBDDReporter itself is configured in the same way across all of them.
For example, to use the SerenityBDDReporter with default settings, you can configure it as follows:
// ...
    crew: [
      '@serenity-js/serenity-bdd',
    ]
// ...
You can customise the behaviour of the SerenityBDDReporter by passing the SerenityBDDReporterConfig configuration object:
// ...
    crew: [
      [ '@serenity-js/serenity-bdd', {
          specDirectory: './spec',
          reporter: {
              includeAbilityDetails: true,
          },
      } ],
    ]
// ...
Check out the next section to learn how to configure the SerenityBDDReporter
for your test runner of choice.
Configuring the Artifact Archiver
Lastly, to store the Serenity BDD-standard JSON reports to disk, your project needs to use the ArtifactArchiver, configured with your preferred output directory.
// ...
    crew: [
      [ '@serenity-js/serenity-bdd', {
          specDirectory: './spec',
          reporter: {
              includeAbilityDetails: true,
          },
      } ],
      [ '@serenity-js/core:ArtifactArchiver', {
          outputDirectory: './target/site/serenity'
      } ],
    ]
// ...
Configuring the test runner
Configuring Playwright Test
Playwright Test is configured using a file called playwright.config.ts that defines the PlaywrightTestConfig.
You should register Serenity/JS test runner adapter for Playwright Test as a Playwright Test reporter
and configure it to use the SerenityBDDReporter and ArtifactArchiver stage crew members.
If you specify the optional testDir property,
Serenity/JS adapter will interpret it as the root directory of your requirements hierarchy.
If you choose not to specify it, Serenity/JS will do its best to automatically detect the requirements hierarchy.
import type { PlaywrightTestConfig } from '@serenity-js/playwright-test'

const config: PlaywrightTestConfig = {
    testDir: './spec', // optional, indicates the root directory of your requirements hierarchy

    reporter: [
        [ '@serenity-js/playwright-test', {
            crew: [
                [ '@serenity-js/serenity-bdd', {
                    specDirectory: './spec'
                } ],
                [ '@serenity-js/core:ArtifactArchiver', {
                    outputDirectory: './target/site/serenity'
                } ],
            ]
        }]
    ],

    // Other configuration omitted for brevity
    // For details, see https://playwright.dev/docs/test-configuration
}

export default config
Learn more about using Serenity/JS with Playwright Test.
Configuring Cucumber
Cucumber.js is configured using either the command line arguments, or a configuration file called cucumber.js that defines Cucumber profiles.
When using Cucumber.js directly, that is without an additional test runner such as WebdriverIO or Protractor, you should register Serenity/JS test runner adapter for Cucumber.js as a Cucumber.js formatter.
If your Cucumber .feature files are stored in a directory other than features, you should configure the specDirectory property
using formatOptions.
module.exports = {
  default: {
    format: ['@serenity-js/cucumber'],
    formatOptions: {
        specDirectory: './features'
    },
    requireModule: ['ts-node/register'],
    require: [
        './features/**/*.steps.ts',
        './features/support/*.hooks.ts',
    ]
  }
}
Note that Serenity/JS stage crew members need to be configured programmatically
by calling the Serenity/JS configure function in a Cucumber.js
BeforeAll hook.
import { BeforeAll } from '@cucumber/cucumber'
import { configure } from '@serenity-js/core'
import * as path from 'path'

BeforeAll(() => {

    // Configure Serenity/JS
    configure({
        crew: [
            [ '@serenity-js/serenity-bdd', {
                // optional, requirements hierarchy root
                specDirectory: path.resolve(__dirname, '..')
            } ],
            [ '@serenity-js/core:ArtifactArchiver', {
                outputDirectory: path.resolve(__dirname, '../../target/site/serenity')
            } ],
            // ... any other reporting services
        ],
    })
})
Learn more about using Serenity/JS with Cucumber.js.
Configuring Mocha
Mocha is configured using either the command line arguments,
or a configuration file, such as .mocharc.yaml.
When using Mocha directly, that is without an additional test runner such as WebdriverIO or Protractor, you should register Serenity/JS test runner adapter for Mocha as a Mocha reporter.
If your Mocha spec files are stored in a directory other than specs, spec, tests, or test, you should configure the specDirectory property
using reporter-options.
reporter: '@serenity-js/mocha'
reporter-options: 'specDirectory=./specs'
require:
  - ts-node/register
  - spec/support/serenity.config.ts
Note that Serenity/JS stage crew members need to be configured programmatically
by calling the Serenity/JS configure function in a Mocha support file, such as spec/support/serenity.config.ts.
import { configure } from '@serenity-js/core'
import * as path from 'path'

configure({
    crew: [
        [ '@serenity-js/serenity-bdd', {
            // optional, requirements hierarchy root
            specDirectory: path.resolve(__dirname, '..')
        } ],
        [ '@serenity-js/core:ArtifactArchiver', {
            outputDirectory: path.resolve(__dirname, '../../target/site/serenity')
        } ],
        // ... any other reporting services
    ],
})
Learn more about using Serenity/JS with Mocha.
Configuring Jasmine
While Jasmine supports configuration via a configuration file located at spec/support/jasmine.json,
any reporters need to be configured using either the command line arguments
or programmatically, by calling the addReporter method of the Jasmine environment in a helper file.
If your Jasmine spec files are stored in a standard location, such as specs, spec, tests, or test subdirectory you don't need to configure anything
and can simply invoke the jasmine command line tool with the --reporter parameter:
jasmine --reporter='@serenity-js/jasmine'
If your spec files are stored in a non-standard location, you should register the Serenity/JS test runner adapter programmatically in a Jasmine helper file, such as spec/helpers/serenity.reporter.ts":
and configure the specDirectory property to point at your desired location:
import serenityReporterForJasmine from '@serenity-js/jasmine'
import * as path from 'path'

jasmine.getEnv().addReporter(serenityReporterForJasmine({
    specDirectory: path.resolve(__dirname, '../')
}))
When using Jasmine directly, that is without an additional test runner such as WebdriverIO or Protractor,
Serenity/JS stage crew members need to be configured programmatically
by calling the Serenity/JS configure function in a Jasmine helper file.
import { configure } from '@serenity-js/core'
import * as path from 'path'

configure({
    crew: [
        [ '@serenity-js/serenity-bdd', {
            // optional, requirements hierarchy root
            specDirectory: path.resolve(__dirname, '..')
        } ],
        [ '@serenity-js/core:ArtifactArchiver', {
            outputDirectory: path.resolve(__dirname, '../../target/site/serenity')
        } ],
        // ... any other reporting services
    ],
})
To make Jasmine load the helpers, create a spec/support/jasmine.json file and specify the location of the helper files.
{
  "spec_files": [
    "**/*.spec.ts"
  ],
  "helpers": [
    "helpers/**/*.ts"
  ],
  "requires": [
    "ts-node/register"
  ]
}
Learn more about using Serenity/JS with Jasmine.
Configuring WebdriverIO
WebdriverIO is configured using a file called wdio.conf.ts that defines the WebdriverIOConfig.
You should register Serenity/JS test runner adapter for WebdriverIO as a WebdriverIO framework,
as it integrates WebdriverIO with a lower-level runner, such as cucumber, jasmine or mocha.
Serenity/JS adapter for WebdriverIO will take care of registering the Serenity/JS adapter for the lower-level runner too, so you don't need to do it yourself.
Additionally, it will allow you to pass options to the lower-level runner via cucumberOpts, jasmineOpts, or mochaOpts properties of the WebdriverIOConfig instead of the separate files
those runners normally require.
import { WebdriverIOConfig } from '@serenity-js/webdriverio'

export const config: WebdriverIOConfig = {

    // Tell WebdriverIO to use Serenity/JS framework
    framework: '@serenity-js/webdriverio',

    // Serenity/JS configuration
    serenity: {
        // Configure Serenity/JS to use the appropriate adapter for your test runner
        runner: 'cucumber',
        // runner: 'mocha',
        // runner: 'jasmine',

        // Register Serenity/JS reporting services, a.k.a. the "stage crew"
        crew: [
            // Optional, produce Serenity BDD reports and living documentation (HTML)
            [ '@serenity-js/serenity-bdd', { specDirectory: './specs' } ],
            [ '@serenity-js/core:ArtifactArchiver', { outputDirectory: 'target/site/serenity' } ],
        ]
    },

    // Configure your Cucumber runner
    cucumberOpts: {
        formatOptions: {
            specDirectory: './features'  // optional, requirements hierarchy root
        },
        // ...
    },


    // ... or Jasmine runner
    // jasmineOpts: {
    //     specDir: './specs'            // optional, requirements hierarchy root
    // },

    // ... or Mocha runner
    // mochaOpts: {
    //     reporterOptions: {
    //         specDirectory: './specs'  // optional, requirements hierarchy root
    //     },
    // },

    runner: 'local',

    // Any other WebdriverIO configuration
}
Learn more about using Serenity/JS with WebdriverIO.
Configuring Protractor
Protractor is configured using a file called protractor.conf.js that defines the Protractor Config.
You should register Serenity/JS test runner adapter for Protractor as a Protractor framework,
as it integrates Protractor with a lower-level runner, such as cucumber, jasmine or mocha.
Serenity/JS adapter for Protractor will take care of registering the Serenity/JS adapter for the lower-level runner too, so you don't need to do it yourself.
Additionally, it will allow you to pass options to the lower-level runner via cucumberOpts, jasmineOpts, or mochaOpts properties of the Protractor config instead of the separate files
those runners normally require.
exports.config = {

    // Tell Protractor to use Serenity/JS framework
    framework:      'custom',
    frameworkPath:  require.resolve('@serenity-js/protractor/adapter'),

    // Serenity/JS configuration
    serenity: {
        // Configure Serenity/JS to use the appropriate adapter for your test runner
        runner: 'cucumber',
        // runner: 'mocha',
        // runner: 'jasmine',

        // Register Serenity/JS reporting services, a.k.a. the "stage crew"
        crew: [
            // Optional, produce Serenity BDD reports and living documentation (HTML)
            [ '@serenity-js/serenity-bdd', { specDirectory: './specs' } ],
            [ '@serenity-js/core:ArtifactArchiver', { outputDirectory: 'target/site/serenity' } ],
        ]
    },

    // Configure your Cucumber runner
    cucumberOpts: {
        formatOptions: {
            // optional, requirements hierarchy root
            specDirectory: './features'
        },
        // ...
    },


    // ... or Jasmine runner
    // jasmineNodeOpts: {
    //     specDir: './specs'           // optional, requirements hierarchy root
    // },

    // ... or Mocha runner
    // mochaOpts: {
    //     reporterOptions: {
    //         specDirectory: './specs' // optional, requirements hierarchy root
    //     },
    // },

    runner: 'local',

    // Any other WebdriverIO configuration
}
Learn more about using Serenity/JS with WebdriverIO.
Generating Serenity BDD HTML reports
To create Serenity BDD HTML reports from the JSON reports generated by the SerenityBDDReporter,
you need to use the Serenity BDD reporting CLI.
The Serenity BDD CLI is a Java program provided as an executable .jar file.
Starting with version 3.30.0
of Serenity/JS, this CLI is included in the @serenity-js/serenity-bdd module.
Alternatively, you can download the latest version from Maven Central if you want to experiment with the newest updates.
Using the Serenity BDD CLI
The @serenity-js/serenity-bdd module includes a command line tool called serenity-bdd, where:
serenity-bdd run- acts as a shortcut to run the Serenity BDD CLI and generate the Serenity BDD HTML reports using default parametersserenity-bdd update- downloads the Serenity BDD CLIjarfile and caches it locally in your project workspace for future use
To learn more about serenity-bdd, run the following command in your computer terminal:
npx serenity-bdd --help
To leran more about the run command and how to change the defaults, run:
npx serenity-bdd --help run
Configuring package.json scripts
To produce Serenity BDD reports, you need to:
- configure your test runner to use the
SerenityBDDReporterand produce the intermediate Serenity BDD.jsonreports - call
serenity-bdd runwhen the test run completes to generate the aggregated HTML report
The pattern used by all the Serenity/JS Project Templates relies on using two additional Node modules:
rimrafas a convenience method to remove any test reports left over from the previous runnpm-failsafeto run the reporting process even if the test suite itself has failed (which is precisely when you need test reports the most...).
{
  "scripts": {
    "clean": "rimraf target",
    "test": "failsafe clean test:execute test:report",
    "test:execute": "cucumber-js",
    "test:report": "serenity-bdd run"
  }
}
Note that in the above code sample, you should configure test:execute to invoke your test runner of choice.
Configuring Serenity BDD CLI
To configure the Serenity BDD reporting CLI,
place a file called serenity.properties
in your project root directory. For example:
serenity.project.name=My awesome project
Please note that Serenity BDD reporting CLI considers only those properties that are related to producing test reports.
Including Custom Fields
You can add custom fields to the overview page of the report.
See the Custom Fields in Reports section for more details.
report.customfields.ApplicationVersion = 1.2.3
report.customfields.User = ${USER}
report.customfields.BuildNumber = ${POTENTIALLY_MISSING_VARIABLE:-Fallback value}
Ensure any environment variables you want to use are exported; otherwise, they won't be picked up.
Serenity BDD Best Practices
While Serenity BDD generates great test reports out of the box, by following a few simple best practices you can turn them into proper living documentation for your product.
In this section, we'll focus on best practices particularly relevant to Serenity/JS users.
The requirements hierarchy
Organising your specs in a directory hierarchy is a great way to make them easier to navigate and understand. It also allows Serenity to organise your test reports in a similar way and offer insight into what requirements were verified at several levels of detail. This idea is called the "requirements hierarchy" and you can learn more about it in the Serenity BDD documentation.
Requirements hierarchy for Cucumber.js projects
If you're working with Cucumber.js, the root directory of the requirements hierarchy is typically called features
and typically contains a flat list of .feature files, each representing a feature of your system:
features
|- authentication.feature
|- shopping_cart.feature
|- checkout.feature
|- shipping.feature
...
While Cucumber.js doesn't recognise or enforce any particular directory structure, Serenity BDD recognises directories
as representing various levels of the requirements hierarchy.
And so, instead of storing all the .feature files in a single directory, you can organise them in a directory hierarchy, where each directory
represents a business capability of your system:
features
|- authentication
|  |- google_sign_in.feature
|  |- microsoft_sign_in.feature
|  |- custom_single_sign-on.feature
|  \- README.md
|
|- shopping_cart
|  |- item_management.feature
|  |- save_for_later.feature
|  |- did_you_forget_something.feature
|  \- README.md
|
|- checkout
...
Note that in this structure, each directory contains a README.md file, which is a great place to document the business capability,
lint to any external documentation, architectural diagrams, and so on. Serenity BDD parses such README.md files and includes their contents
in the generated documentation.
For more complex systems, you can also nest the business capability directories further to group related capabilities into themes, for example:
features
|- security
|  |- authentication
|  |  |- google_sign_in.feature
|  |  |- microsoft_sign_in.feature
|  |  |- custom_single_sign-on.feature
|  |  \- README.md
|  |
|  |- audit_trail
|     |- monthly_report.feature
|     |- unexpected_user_activity_alerting.feature
|     \- README.md
Requirements hierarchy for non-Cucumber.js projects
If you're using any other supported test runner, Serenity BDD will still recognise the directory structure as the requirements hierarchy as long as you:
- name the root directory of your requirements hierarchy
spec,specs,tests,testorfeatures(or configure thespecDirectoryproperty of theSerenityBDDReporterand the--featuresparameter ofserenity-bdd runcommand with a different value) - give your spec files a suffix recognised by Serenity BDD, such as
.spec.ts,.e2e.js, or one of the other supported file name suffixes
For example, if you're using Playwright Test, Mocha, or Jasmine you might organise your specs as follows:
spec
|- security
|  |- authentication
|  |  |- google_sign_in.spec.ts
|  |  |- microsoft_sign_in.spec.ts
|  |  |- custom_single_sign-on.spec.ts
|  |  \- README.md
|  |
|  |- audit_trail
|     |- monthly_report.spec.ts
|     |- unexpected_user_activity_alerting.spec.ts
|     \- README.md
Requirements hierarchy for web UI component testing projects
If you're using Serenity/JS to test web UI components, you might be following the popular convention of storing your spec files next to the component they're testing:
src
\- components
   |- authentication
   |  |- input-fields
   |  |  |- EmailField.ts
   |  |  |- EmailField.spec.ts
   |  |  |- PasswordField.ts
   |  |  |- PasswordField.spec.ts
   |  |  \- README.md
   |  |- LoginForm.ts
   |  |- LoginForm.spec.ts
   |  \- README.md
   |
   \- shopping_cart
If your UI components and their specs are stored in a top-level directory called src, Serenity BDD will recognise the src directory as the root of your requirements hierarchy and will group the specs accordingly.
If your top-level directory has a different name, you can configure the specDirectory property of the SerenityBDDReporter and the --features parameter of serenity-bdd run command with a different value.
When using the above directory structure, make sure that the outermost describe block in your spec files has a name matching the name of the component being tested, for example:
import { test as componentTest } from '@playwright/experimental-ct-react'
import { useBase } from '@serenity-js/playwright-test'

const { it, describe } = useBase(componentTest)

describe('EmailField', () => {

    it('allows the user to enter a valid address', async ({ actor }) => {
        // ...
    })
})
File naming conventions
To help Serenity BDD correctly associate the test results with the right feature, you should keep each feature in a separate spec file, where the name of the feature is the same as the name of the spec file.
If you're using Cucumber.js, you might have a custom_single_sign-on.feature file
with a matching Feature name:
Feature: Custom single sign-on

  As a student
  I want to be able to sign in using my company's single sign-on solution
  So that I don't have to remember yet another password

  Scenario: Signing in with a corporate email address

    Given Alice wants to access her student account details
     When she enters her corporate email address: alice@example.org
      And completes the sign-in process using her corporate credentials
     Then she should be taken to her student account
For Playwright Test,
Mocha and Jasmine specs,
you might have a custom_single_sign-on.spec.ts file where the outermost describe block has a matching name:
describe('Custom single sign-on', () => {

    it('allows Alice to sign in with a corporate email address', () => {
        // ...
    })
})
Serenity BDD treats spaces and underscores as equivalent and performs a case-insensitive match,
so custom_single_sign-on.feature or custom_single_sign-on.spec.ts
match Custom single sign-on as well as Custom Single Sign-On.
Try to avoid having multiple top-level describe blocks in a single spec file, or it/test blocks without a describe block
as Serenity BDD will not be able to associate the test results with the right feature.
Upgrade guide
Serenity/JS uses semantic versioning and introduces backward-incompatible changes only in major releases. This section provides guidance on how changes in Serenity/JS 3 might affect your existing project and how to upgrade your configuration to the new syntax.
Upgrading to Serenity/JS 3 configuration syntax
If you have an existing project that uses the Serenity/JS 2 configuration syntax, you should update it to follow the Serenity/JS 3 convention:
- import { ArtifactArchiver } from '@serenity-js/core'
- import { SerenityBDDReporter } from '@serenity-js/serenity-bdd'

// ...
    crew: [
-     new SerenityBDDReporter(),
-     ArtifactArchiver.storingArtifactsAt('./target/site/serenity'),
+     '@serenity-js/serenity-bdd',
+     [ '@serenity-js/core:ArtifactArchiver', {
+       outputDirectory: 'target/site/serenity'
+     } ],
    ]
// ...
The new string-based configuration syntax improves portability and allows Serenity/JS to configure test runners that support parallel test execution across multiple worker processes.
Using the default Serenity BDD CLI
As of Serenity/JS 3.30.0, @serenity-js/serenity-bdd module ships with the Serenity BDD CLI .jar file, so you no longer need to download it separately.
If your Serenity/JS project uses version 3.30.0 or newer, you can remove the postinstall script and use the default Serenity BDD CLI instead:
{
  "scripts": {
-   "postinstall": "serenity-bdd update",
    "clean": "rimraf target",
    "test": "failsafe clean test:execute test:report",
    "test:execute": "cucumber-js",
    "test:report": "serenity-bdd run"
  }
}
Using a custom Serenity BDD CLI
If you need to use a specific version of the Serenity BDD CLI, you can configure the serenity-bdd update command to download it from Maven Central
or your company's artifact registry.
This is typically done using the postinstall script defined in your package.json file:
{
  "scripts": {
    "postinstall": "serenity-bdd update",
    "clean": "rimraf target",
    "test": "failsafe clean test:execute test:report",
    "test:execute": "cucumber-js",
    "test:report": "serenity-bdd run"
  }
}
Using a custom artifact registry
To download Serenity BDD reporting CLI jar from your company's artifact repository, specify the --repository parameter:
npx serenity-bdd update --repository https://artifactory.example.org/
To learn more about the update command, run:
npx serenity-bdd --help update
Please note that the update command will try to download the .jar only if you don't have it cached already, or when the one you have is not up to date. Otherwise, no outbound network calls are made.
Downloading through a proxy
The update command picks up your proxy configuration automatically from your NPM config, .npmrc file, or environment variables.
Please note that you only need to use one of those configuration mechanisms.
Using NPM config (Linux, macOS, Windows)
To use NPM-level configuration, run the following commands in your terminal:
npm config set proxy http://[user:pwd]@domain.tld:port
npm config set https-proxy http://[user:pwd]@domain.tld:port
If your proxy requires a certificate file, you can provide a path to it as follows:
npm config set cafile /path/to/root-ca.pem
The above can also be accomplished by placing an .npmrc file with following contents in your home directory or your project root:
# ~/.npmrc
proxy = http://[user:pwd]@domain.tld:port
https-proxy = http://[user:pwd]@domain.tld:port

cafile = /path/to/root-ca.pem          # optional
noproxy = localhost,mycompany.com      # optional
Using environment variables on Linux or macOS
To set your proxy on Linux or macOS, run the following commands in your terminal:
export HTTP_PROXY=http://[user:pwd]@domain.tld:port
export HTTPS_PROXY=http://[user:pwd]@domain.tld:port
If needed, you can also set a NO_PROXY variable to a comma-separated list of domains that don't require a proxy, for example:
export NO_PROXY=localhost,mycompany.com
Please note that you can add the above commands to your shell's ~/.profile, so that they're executed whenever you open a new terminal.
Using environment variables on Windows
To configure a proxy on Windows, run the following commands in Command Prompt:
set HTTP_PROXY=http://[user:pwd]@domain.tld:port
set HTTPS_PROXY=http://[user:pwd]@domain.tld:port
If you're using Powershell, run the following commands instead:
$env:HTTP_PROXY = http://[user:pwd]@domain.tld:port
$env:HTTPS_PROXY = http://[user:pwd]@domain.tld:port
Using a specific User-Agent
If your artifact registry requires you to use a specific user agent, you can configure it using NPM config:
npm config set user-agent "Mozilla/5.0 (X11; Linux x86_64; rv:52.0) Gecko/20100101 Firefox/52.0"
Ignoring SSL checks
You can instruct the update command to ignore any SSL certificate errors by providing an --ignoreSSL flag when running the command:
npx serenity-bdd update --ignoreSSL
You can also disable certificate checks at the NPM config level by running:
npm config set strict-ssl false
Alternative, you can accomplish the same with an .npmrc file:
# ~/.npmrc
npm_config_strict-ssl = false
Integration architecture
SerenityBDDReporter emits ArtifactGenerated events containing Serenity BDD-standard JSON reports,
which can be stored to disk by ArtifactArchiver,
and then turned into Serenity BDD HTML reports by Serenity BDD Reporting CLI.
