Serenity/JS for Cucumber Users
Already using Cucumber.js? Serenity/JS plugs right into your existing setup — with Playwright or WebdriverIO driving the browser.
You keep Cucumber's Gherkin syntax, step definitions, and hooks. Serenity/JS adds the Screenplay Pattern, structured reporting, and multi-actor support that matter once your feature files outgrow a handful of scenarios.
Why add Serenity/JS?
Serenity/JS works on top of Cucumber.js — your existing feature files, step definitions, and CI/CD pipeline all stay exactly as they are. You don't need to rewrite anything.
Here's how Serenity/JS helps you address common Cucumber challenges:
| Challenge | How Serenity/JS helps |
|---|---|
| Step definitions coupled to selectors | The Screenplay Pattern gives you composable Tasks that separate what from how |
| Reports show only pass/fail | Serenity BDD reports generate living documentation organised by feature and capability |
| Multi-user workflows are awkward | Multi-actor support is built in — actorCalled('Alice') and actorCalled('Bob') in the same scenario |
| Step definitions are hard to reuse | Screenplay Tasks are composable and portable — reuse them across step definitions, scenarios, and projects |
| Locked into one browser driver | Screenplay Tasks work with both Playwright and WebdriverIO — switch without rewriting logic |
| Slow UI-only test suites | Blended testing — use APIs for setup, UI only where it matters |
Get started in 5 minutes
The progression most teams go through looks like this:
- Add reporting (Steps 1–3) — configure the Serenity/JS adapter and reporters. Existing scenarios get better reports immediately.
- Use Screenplay for new step definitions (Step 4) — use the actor model for new scenarios. Old step definitions stay untouched.
- Extract shared Tasks — refactor common workflows into reusable building blocks.
- Blended testing — mix UI and API interactions in the same scenario for speed and reliability.
Step 0: Create a Cucumber project
Skip this step and proceed with the remaining steps from your project directory.
Create a new directory and initialise a Cucumber project:
mkdir my-serenity-project
cd my-serenity-project
npm init -y
npm install --save-dev @cucumber/cucumber typescript ts-node @types/node
Create a tsconfig.json:
{
  "compilerOptions": {
    "target": "ES2021",
    "module": "commonjs",
    "lib": ["ES2021"],
    "strict": true,
    "esModuleInterop": true,
    "outDir": "./lib"
  }
}
Step 1: Install
You'll need a recent Node.js LTS version (Serenity/JS supports Node 22.12 and 24), as well as Java 11+ for the Serenity BDD reports.
- npm
- Yarn
- pnpm
npm install --save-dev @serenity-js/core @serenity-js/cucumber @serenity-js/web @serenity-js/assertions @serenity-js/playwright @serenity-js/console-reporter @serenity-js/serenity-bdd rimraf npm-failsafe playwright
yarn add --dev @serenity-js/core @serenity-js/cucumber @serenity-js/web @serenity-js/assertions @serenity-js/playwright @serenity-js/console-reporter @serenity-js/serenity-bdd rimraf npm-failsafe playwright
pnpm add --save-dev @serenity-js/core @serenity-js/cucumber @serenity-js/web @serenity-js/assertions @serenity-js/playwright @serenity-js/console-reporter @serenity-js/serenity-bdd rimraf npm-failsafe playwright
→ Learn more: Full Cucumber installation guide | Why Serenity/JS?
Step 2: Configure
Create a Cucumber profile that attaches the Serenity/JS adapter:
default:
  requireModule:
    - ts-node/register
  format:
    - '@serenity-js/cucumber'
  require:
    - ./features/**/*.steps.ts
    - ./features/**/*.config.ts
Create a Serenity/JS configuration file:
import { BeforeAll, AfterAll } from '@cucumber/cucumber'
import { configure, Cast } from '@serenity-js/core'
import { BrowseTheWebWithPlaywright } from '@serenity-js/playwright'

import * as playwright from 'playwright'

let browser: playwright.Browser;

BeforeAll(async () => {
    browser = await playwright.chromium.launch({ headless: true });

    configure({
        actors: Cast.where(actor =>
            actor.whoCan(BrowseTheWebWithPlaywright.using(browser)),
        ),
        crew: [
            '@serenity-js/console-reporter',
            [ '@serenity-js/serenity-bdd', { specDirectory: './features' } ],
            [ '@serenity-js/core:ArtifactArchiver', {
                outputDirectory: './reports/serenity'
            } ],
        ],
    });
});

AfterAll(async () => {
    await browser?.close();
});
Add the following scripts to your package.json:
Lines marked with + should be added to your file; lines marked with - should be removed. Don't copy the +/- prefixes themselves.
 {
   "scripts": {
+    "clean": "rimraf target",
+    "test": "failsafe clean test:execute [...] test:report",
+    "test:execute": "cucumber-js",
+    "test:report": "serenity-bdd run --features='./features' --source='./reports/serenity' --destination='./reports/serenity'"
   }
 }
→ Learn more: Cucumber configuration | Serenity BDD reporter setup | Using npm-failsafe
Step 3: Run
npm test
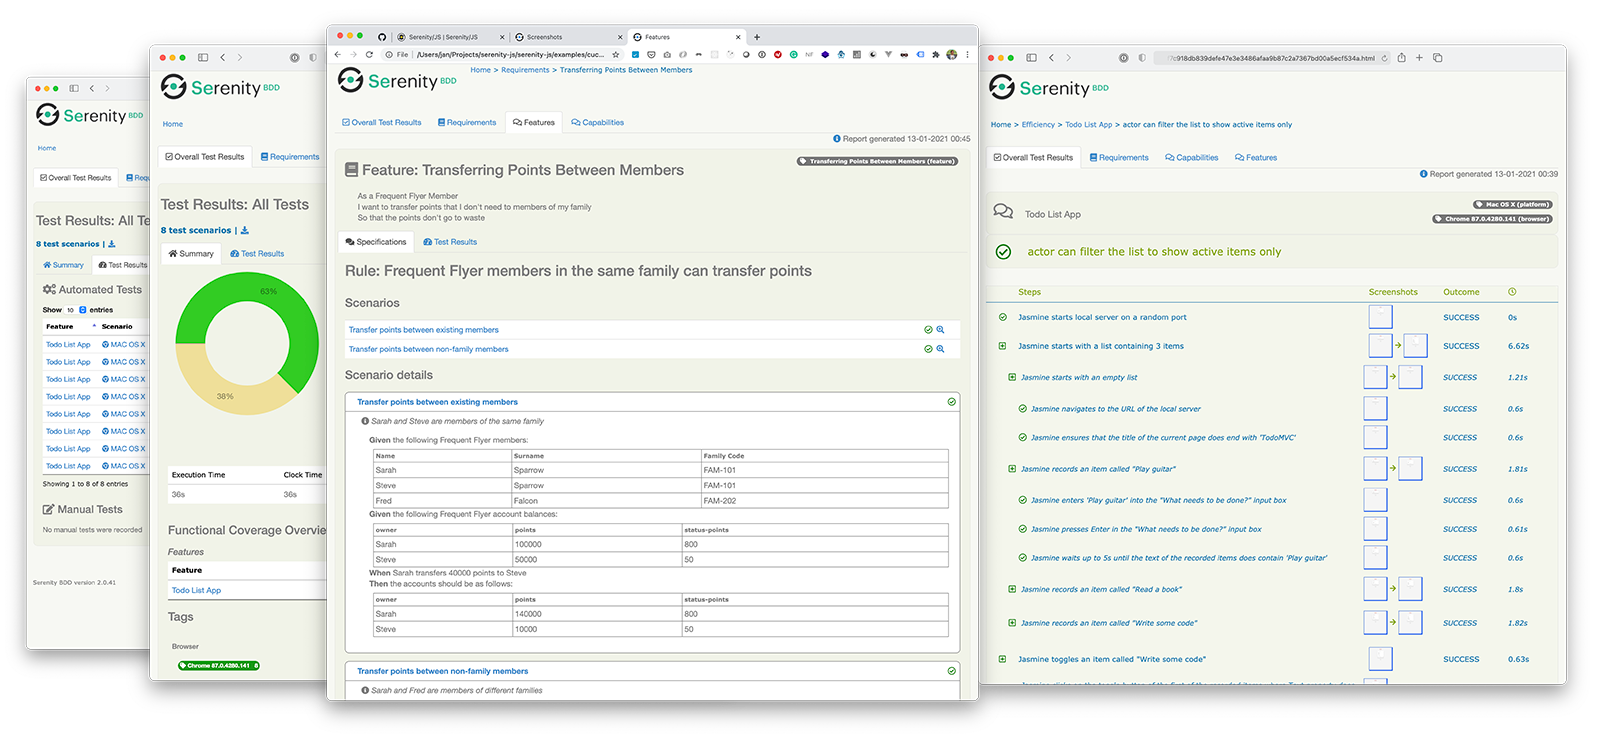
That's it. Your existing scenarios run as before, but now produce a rich HTML report in reports/serenity/. Open reports/serenity/index.html in your browser to view it.
The [...] wildcard in the test script is provided by npm-failsafe and passes any arguments you provide directly to Cucumber. For example, to run scenarios by name:
npm test -- --name="descriptive title"
Or to run scenarios by tag:
npm test -- --tags="@smoke"
→ Learn more: Reporting overview | Serenity BDD reports
Step 4 (optional): Write your first Screenplay scenario
Steps 1–3 give you better reporting with zero changes to your step definitions. When you're ready to see what the Screenplay Pattern looks like with Cucumber, add a new feature file and step definitions:
Feature: Website

  Scenario: The serenity-js.org website should have a descriptive title
    When Serena navigates to "https://serenity-js.org/"
    Then she should see that the page title includes "Serenity/JS"
import { defineParameterType } from '@cucumber/cucumber'
import { actorCalled, actorInTheSpotlight } from '@serenity-js/core'

defineParameterType({
    regexp: /[A-Z][a-z]+/,
    transformer(name: string) {
        return actorCalled(name);
    },
    name: 'actor',
});

defineParameterType({
    regexp: /he|she|they|his|her|their/,
    transformer() {
        return actorInTheSpotlight();
    },
    name: 'pronoun',
});
import { When, Then } from '@cucumber/cucumber'
import { Actor } from '@serenity-js/core'
import { Ensure, includes } from '@serenity-js/assertions'
import { Navigate, Page } from '@serenity-js/web'

When('{actor} navigates to {string}', async (actor: Actor, url: string) => {
    await actor.attemptsTo(
        Navigate.to(url),
    );
});

Then('{pronoun} should see that the page title includes {string}', async (actor: Actor, expectedTitle: string) => {
    await actor.attemptsTo(
        Ensure.that(
            Page.current().title().describedAs('current page title'),
            includes(expectedTitle),
        ),
    );
});
Run npm test again. In the Serenity BDD report you'll now see each interaction (Navigate.to, Ensure.that) listed as a separate step with timing.
The key differences from plain Cucumber step definitions:
parameter.steps.tsregisters the{actor}and{pronoun}Cucumber expression parameter types that Serenity/JS uses to resolve actors by name.actorCalled('Serena')creates a named actor — the actor has a browser, but can also interact with REST APIs, multiple browser contexts, etc.Navigate.to()andEnsure.that()are composable interactions that show up as named steps in your reports.{actor}and{pronoun}automatically resolve to the correct actor instance based on the name or pronoun used in the Gherkin step.
For a more advanced example showing composable Tasks, the Lean Page Objects pattern, and masked credentials, see the Complete example below.
→ Learn more: Screenplay Pattern | Your first web scenario
Screenplay Tasks are identical whether you use Cucumber, Playwright Test, or WebdriverIO as your test runner — only the configuration differs. See Serenity/JS with Playwright.
Reference projects
Complete example
A self-contained project you can copy in full. It includes:
features/website.feature— a simple Screenplay scenario usingNavigateandEnsure(same pattern as Step 4)features/swag-labs.feature— a more advanced scenario interacting with the Swag Labs demo website, using composableTaskdefinitions and the Lean Page Objects pattern
Run npm install then npm test — the Serenity BDD HTML report lands in reports/serenity/index.html.
The password secret_sauce is hard-coded in these examples to keep them simple and self-contained. In real-world tests, load credentials from environment variables or a password vault to avoid committing secrets to your repository.
- swag-labs.feature
- Step definitions
- Authenticate.ts
- Inventory.ts
- Checkout.ts
Feature: Swag Labs

  Scenario: Standard user completes checkout
    Given Alice has logged in with credentials "standard_user" and "secret_sauce"
     When she adds "Sauce Labs Backpack" to the cart
      And she completes checkout with:
        | firstName  | Alice |
        | lastName   | Smith |
        | postalCode | 90210 |
     Then she should see the confirmation "Thank you for your order!"
import { Given, When, Then, DataTable } from '@cucumber/cucumber'
import { actorCalled } from '@serenity-js/core'
import { Navigate } from '@serenity-js/web'
import { Ensure, equals } from '@serenity-js/assertions'

import { Authenticate } from '../screenplay/Authenticate'
import { Inventory } from '../screenplay/Inventory'
import { Checkout } from '../screenplay/Checkout'

Given('{actor} has logged in with credentials {string} and {string}',
    async (actor, username, password) => {
        await actor.attemptsTo(
            Navigate.to('https://www.saucedemo.com/'),
            Authenticate.withCredentials(username, password),
        );
    }
);

When('{pronoun} adds {string} to the cart',
    async (actor, itemName) => {
        await actor.attemptsTo(
            Inventory.productCalled(itemName).addToCart(),
        );
    }
);

When('{pronoun} completes checkout with:', async (actor, dataTable: DataTable) => {
    const info = dataTable.rowsHash();
    await actor.attemptsTo(
        Checkout.completeWith(info),
    );
});

Then('{pronoun} should see the confirmation {string}',
    async (actor, expectedText) => {
        await actor.attemptsTo(
            Ensure.that(Checkout.confirmationHeading(), equals(expectedText)),
        );
    }
);
import { Masked, Task } from '@serenity-js/core';
import { Click, Enter, PageElement, By } from '@serenity-js/web';

export class Authenticate {
    private static usernameField =
        PageElement.located(By.css('[data-test="username"]')).describedAs('username field');

    private static passwordField =
        PageElement.located(By.css('[data-test="password"]')).describedAs('password field');

    private static loginButton =
        PageElement.located(By.css('[data-test="login-button"]')).describedAs('login button');

    static withCredentials = (username: string, password: string) =>
        Task.where(`#actor logs in as ${ username }`,
            Enter.theValue(username).into(Authenticate.usernameField),
            Enter.theValue(Masked.valueOf(password)).into(Authenticate.passwordField),
            Click.on(Authenticate.loginButton),
        );
}
import { Task } from '@serenity-js/core';
import { Click, Text, PageElement, By } from '@serenity-js/web';

export class ProductCard {
    constructor(private name: string) {}

    private card = PageElement.located(By.css(
        `[data-test="inventory-item"]:has([data-test="inventory-item-name"]:text("${ this.name }"))`
    )).describedAs(`product card for "${ this.name }"`);

    private inventoryItemPrice =
        PageElement.located(By.css('[data-test="inventory-item-price"]'))
            .of(this.card).describedAs(`price of "${ this.name }"`);

    private addToCartButton =
        PageElement.located(By.css('[data-test^="add-to-cart"]'))
            .of(this.card).describedAs(`"Add to cart" button for "${ this.name }"`);

    price = () =>
        Text.of(this.inventoryItemPrice);

    addToCart = () =>
        Task.where(`#actor adds "${ this.name }" to the cart`,
            Click.on(this.addToCartButton),
        );
}

export class Inventory {
    static productCalled = (name: string) => new ProductCard(name);
}
import { Task } from '@serenity-js/core';
import { Click, Enter, Text, PageElement, By } from '@serenity-js/web';

export class Cart {
    private static cartLink =
        PageElement.located(By.css('[data-test="shopping-cart-link"]')).describedAs('shopping cart link');

    private static checkoutButton =
        PageElement.located(By.css('[data-test="checkout"]')).describedAs('checkout button');

    static open = () =>
        Task.where('#actor opens the shopping cart',
            Click.on(Cart.cartLink),
        );

    static checkout = () =>
        Task.where('#actor proceeds to checkout',
            Cart.open(),
            Click.on(Cart.checkoutButton),
        );
}

export class Checkout {
    private static firstNameField =
        PageElement.located(By.css('[data-test="firstName"]')).describedAs('first name');

    private static lastNameField =
        PageElement.located(By.css('[data-test="lastName"]')).describedAs('last name');

    private static postalCodeField =
        PageElement.located(By.css('[data-test="postalCode"]')).describedAs('postal code');

    private static continueButton =
        PageElement.located(By.css('[data-test="continue"]')).describedAs('continue button');

    private static finishButton =
        PageElement.located(By.css('[data-test="finish"]')).describedAs('finish button');

    private static confirmationHeader =
        PageElement.located(By.css('[data-test="complete-header"]')).describedAs('confirmation heading');

    static completeWith = (info: { firstName: string; lastName: string; postalCode: string }) =>
        Task.where(`#actor completes checkout`,
            Cart.checkout(),
            Enter.theValue(info.firstName).into(Checkout.firstNameField),
            Enter.theValue(info.lastName).into(Checkout.lastNameField),
            Enter.theValue(info.postalCode).into(Checkout.postalCodeField),
            Click.on(Checkout.continueButton),
            Click.on(Checkout.finishButton),
        );

    static confirmationHeading = () =>
        Text.of(Checkout.confirmationHeader);
}
Project templates
If you'd rather start from a fully configured project than add Serenity/JS to an existing one, use one of these GitHub template repositories. Each comes with CI configuration, example tests, and live reports you can preview.
| Stack | Live Report |
|---|---|
| Cucumber + Playwright | Serenity BDD |
| Cucumber + WebdriverIO | Serenity BDD |
FAQ
Does it slow down my tests?
No. Serenity/JS adds negligible overhead.
Do I have to rewrite all my step definitions?
No. Mix Screenplay and non-Screenplay step definitions in the same project. Start with reporting and introduce Screenplay gradually for new scenarios.
Can I use it with WebdriverIO instead of Playwright?
Yes. Replace @serenity-js/playwright with @serenity-js/webdriverio and configure the cast of actors accordingly. Your Tasks stay identical — only the Ability configuration changes. See the Cucumber + WebdriverIO template.
Do I need Java?
Yes, for the Serenity BDD HTML reports (Java 11+). If you'd rather stay Java-free, use the console reporter alone.
What Cucumber versions are supported?
Serenity/JS supports all modern versions of @cucumber/cucumber. The adapter detects your version automatically.
Check the Troubleshooting guide for solutions to common issues with reports, screenshots, and configuration.
Next steps
- Why Serenity/JS? — same test at three levels of abstraction
- 15-minute tutorial — build your first Screenplay test
- Cucumber integration guide — detailed setup and configuration
- Project templates — all available starter projects
- Troubleshooting — solutions to common issues
Community tutorials
- Reuse Component Test Code with BDD Scenarios using Serenity/JS and Playwright — reuse the same Screenplay Tasks across component tests and Cucumber scenarios, by Jan Graefe
- Serenity/JS and Actor Notepads for Injecting User Credentials — manage per-actor test credentials using the Notepad pattern, by Jan Graefe
If you don't need Gherkin syntax, Serenity/JS works directly with Playwright Test or WebdriverIO for a simpler setup. See Serenity/JS with Playwright or Serenity/JS with WebdriverIO.
